Dang time flies.
I've been wanting to do a "hurtlocker truck" update for a while.
Now there's way too many pictures to post easily.
So instead of doing a way too huge time-line post,
I'll just do a couple posts on certain key projects.
You're gonna see a ton more work the next couple weeks,
cause the owner is getting shipped out to the "big A" in about a month.
Bummer!
But it's a good enough reason to bump up the 26 hours I get to put in each month!
Where to start.
How about the hood.
Each corner of the hood was pinched.
With the amount of torture this old truck had been through,
I doubt the hood had even gaps.
I'm not sure if this is the correct way to do this,
but I like to simply tack the hood into place.
This keeps the work situated permanently.
Yeah that passenger corner opened up a little too big,
and you'll see later on I bumped it out after this shot...
Both front corners were really wedged in,
but the long gaps were actually ok.
So again I'm figuring this was like this for a while.
If you look below the headlight,
he wanted the turn signal lights blocked off.
This was a big pain in the arse,
as its not a simple curve or bowl,
it's a convoluted headache.
After welding hours and hours of FORD sheetmetal,
I'm gonna say that the steel recipe GM used is far inferior for welding work.
For that light patch,
I ended up using sheetmetal from an old F100 fender,
and it made it that more obvious.
The Ford steel just begs to be melted and formed.
Obviously this wasn't done in the same day.
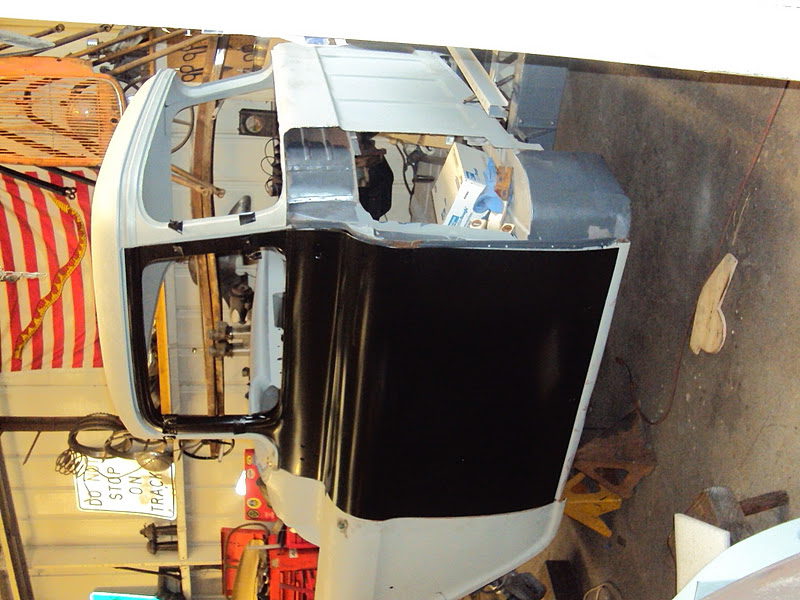
So did you notice that new black thing?
Yep,
a brand new door.
They make these almost perfect doors now.
The original driver's door was almost all bondo,
and the inside had been cut out for access with a ball peen hammer.
Yep,
brand new hinges.
The old hinges only needed a oversized hinge kit,
but the couple hours spent to drill each one vs buying new hinges...
it's fun spending someone elses money!
Yea,
I'll spend 2 weeks building my own hinges for the 40...
I wish I could say this thing went in easily.
It only magnified how wacked the cab and fender really were!
The passenger door seemed saveable.
The only bad part was the custom lip someone beat in with a claw hammer
and some vice grips.
I can only imagine the creak this door must have made each time it opened.
Had to have been bad to need an inch clearance to the fender!
After a little bit of hammering,
the door came out straight enough to be straight,
but there will be some bondo needed to get out the claw marks.
I did half-ass on the door though.
The bottom is still missing.
Too much to tackle for the time alotted last month.
I'll have to figure this out at a later date.
At least the top part is ok for now.
With the door in place,
it was obvious the fender needed some shims to get flush.
The gap was really tight,
so the old cut and weld trick had to be performed.
Than the bottom fender patch panel was stuck in.
Today everything in the front was welded up enough to slap some primer on.
It was a big deal.
For me its easier to do all the cutting,
then all the welding,
then all the finish hammering and grinding,
instead of starting and finishing one particular section at a time.
Also,
I'm not sure if you figured this out,
but this was all done at the same time as the 40 hinges.
perich brothers (and sister): swingers
It was weird,
as I was working on the same body parts of each project each work day.
I'll get the rear cab update as soon as I get that corner piece in.
Crossing my fingers for tomorrow!
TP
I've been wanting to do a "hurtlocker truck" update for a while.
Now there's way too many pictures to post easily.
So instead of doing a way too huge time-line post,
I'll just do a couple posts on certain key projects.
 |
| hurtlocker truck 1955 chevy |
You're gonna see a ton more work the next couple weeks,
cause the owner is getting shipped out to the "big A" in about a month.
Bummer!
But it's a good enough reason to bump up the 26 hours I get to put in each month!
Where to start.
How about the hood.
 |
| pinched corner |
Each corner of the hood was pinched.
With the amount of torture this old truck had been through,
I doubt the hood had even gaps.
I'm not sure if this is the correct way to do this,
but I like to simply tack the hood into place.
This keeps the work situated permanently.
 |
| little too big |
Yeah that passenger corner opened up a little too big,
and you'll see later on I bumped it out after this shot...
 |
| pinched front |
Both front corners were really wedged in,
but the long gaps were actually ok.
So again I'm figuring this was like this for a while.
 |
| decent gap |
If you look below the headlight,
he wanted the turn signal lights blocked off.
This was a big pain in the arse,
as its not a simple curve or bowl,
it's a convoluted headache.
 |
| little by little |
After welding hours and hours of FORD sheetmetal,
I'm gonna say that the steel recipe GM used is far inferior for welding work.
For that light patch,
I ended up using sheetmetal from an old F100 fender,
and it made it that more obvious.
The Ford steel just begs to be melted and formed.
 |
| what's that black thing? |
Obviously this wasn't done in the same day.
So did you notice that new black thing?
 |
| Wow brand new door! |
Yep,
a brand new door.
 |
| perfect replica |
They make these almost perfect doors now.
The original driver's door was almost all bondo,
and the inside had been cut out for access with a ball peen hammer.
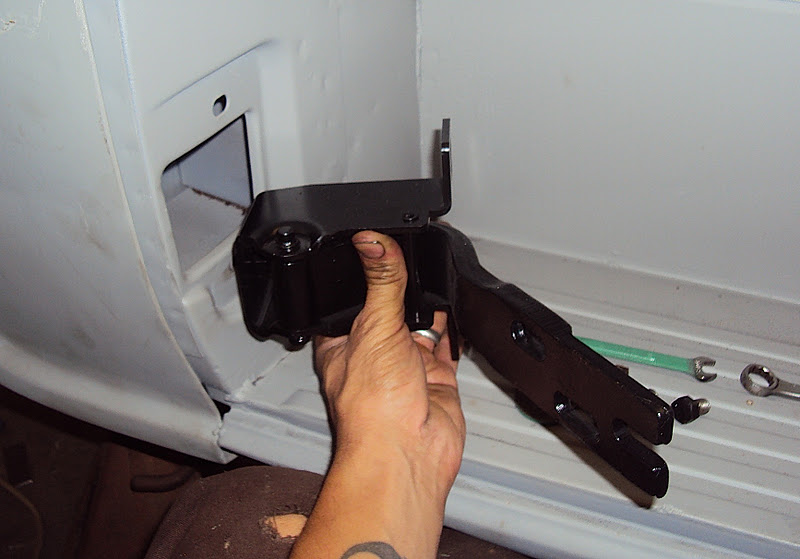 |
| Wow brand new hinges! |
Yep,
brand new hinges.
The old hinges only needed a oversized hinge kit,
but the couple hours spent to drill each one vs buying new hinges...
it's fun spending someone elses money!
Yea,
I'll spend 2 weeks building my own hinges for the 40...
 |
| hung |
I wish I could say this thing went in easily.
It only magnified how wacked the cab and fender really were!
 |
| old door |
The passenger door seemed saveable.
The only bad part was the custom lip someone beat in with a claw hammer
and some vice grips.
 |
| custom door lip |
I can only imagine the creak this door must have made each time it opened.
Had to have been bad to need an inch clearance to the fender!
 |
| three amigos |
After a little bit of hammering,
the door came out straight enough to be straight,
but there will be some bondo needed to get out the claw marks.
 |
| hammered |
I did half-ass on the door though.
The bottom is still missing.
Too much to tackle for the time alotted last month.
 |
| drainage |
I'll have to figure this out at a later date.
At least the top part is ok for now.
 |
| gaps and patches |
With the door in place,
it was obvious the fender needed some shims to get flush.
The gap was really tight,
so the old cut and weld trick had to be performed.
Than the bottom fender patch panel was stuck in.
 |
| primed |
Today everything in the front was welded up enough to slap some primer on.
It was a big deal.
For me its easier to do all the cutting,
then all the welding,
then all the finish hammering and grinding,
instead of starting and finishing one particular section at a time.
Also,
I'm not sure if you figured this out,
but this was all done at the same time as the 40 hinges.
perich brothers (and sister): swingers
It was weird,
as I was working on the same body parts of each project each work day.
I'll get the rear cab update as soon as I get that corner piece in.
Crossing my fingers for tomorrow!
TP
Awesome! THis just gave me a little kick in the ass to get back on my 52, I miss driving it.
ReplyDeleteI was wondering what was up with that old truck.
ReplyDeleteLet's see an update!
TP