23 June 2015

lady workhorse

I've called this place the sweat factory many times before,
definitely hasn't changed.
This time I did nothing.
No oil change or tune-up,
just checked the gas cap for cracks.
The numbers were surprisingly low,
passing way below the averages.
Now we may have the lady workhorse 
for another two years!
Time to give her a little attention.
I had mined a clean motorcraft alternator 
at the last junkyard visit.
The battery light was starting to flicker every now and then.
Out of the dozen or so Crown Vic's,
this was the best one.
That is the key to a budget daily driver,
pick a model that has cheap and readily available junked parts.
This custom tension bar is a key tool,
although a breaker bar may have worked.
Even with the late summer daylight,
projects always end up with a single bulb!
If Jaxon's lucky this may be his first car.
Actually that would make his mom the lucky one,
that is if she'd give it up.
TP

20 June 2015

horny

I keep busy,
but not too busy searching for junk
to clutter or house with.
Last week I tried to show that I was in control,
not obtaining and getting rid of things,
but a few slipped through the cracks.
It started with these industrial la scala cabinets,
the perfect start to a hot rod speaker system,
a Klipsch based upgrade called the Jubescala.
People have gone crazy frankensteining components together,
not that our originals sound bad,
it's a grass is greener thing.
One thing noticeable with horn technology,
is an attention to detail in minute measurements.
On the flip side,
Klipsch bolted the horns inside the wood,
leaving a curbed transition.
If that didn't matter,
then do the other measurements matter?
Too much thinking caused me to let go of the carpeted speaker boxes.
The parts could easily break the bank,
15" woofers, crossovers, mid-drivers...
Also the la scalas are known for a weak bass cutoff,
and the fix is this 10" riser,
decreasing the 50hz cutoff to 35hz,
subwoofer territory.
Less then a week after they were gone,
with the help of my cuñada in Camarillo,
I found the perfect top horn,
the Altec 511e.
Supposedly a bolt-in.
Here's someone else's project.
Why?
Well the story with the la scala design,
is they were designed for a long throw to an audience,
not 10 feet away on the couch.
Inside is a long midrange horn that shoots like a cannon,
making the speaker position critical.
That's what forces an extra deep cabinet.
Then one night these popped up on craigslist,
an early version of the Altec 31A bent horn.
This has similar characteristics as the k400 in the la scala,
but half the cabinet.
There's also a wider dispersion angle,
which is better close up,
although the stereo separation decreases with distance.
We found out the horns are natural amplifiers,
the reason why they're so efficient.
An anemic iphone plugged into the hole,
was a decent sound system!
The same seller also had these,
fiberglass EV hr6040's (I think).
Electrovoice had the patents on many basic horn designs,
forcing other companies to become creative.
The wife would love these monsters 
in our small living room!
Anyway these deals have been amazingly cheap,
it's the time thinking that gets expensive!
TP

18 June 2015

Whaler Resto - part viii - thrash

All the big boat pieces were fitting together as planned.
In the picture the whaler looked ready to run,
and in a half-a$$ way it could've.
Instead we were going the full-a$$ way.
I want the kids to beat this up over the summer,
not be saddled with broken fixits.
The seats were super flimsy.
Nights were spent designing a stiffener.
The goal was to not have vertical posts,
leaving the floor open.
This aluminum channel was scrapped from the old kayak truck,
and dragged around for the past 10 years.
The perfect solution,
thick enough to tap and really stiff.
No more cringing when the kids bounced
on the diving board like planks.
More scrap from the recent prop shaft covers,
utilized for the bilge screens.
The engine was finally mounted.
The Johnson cover had cracked locking plates,
so the seized engine donated the more stylish cowl.
A cool Italian stern light was found on eBay,
but it didn't look as enormous in the pictures.
This one was not as overbearing.
A hinged mount was fabbed up,
allowing it to fold down.
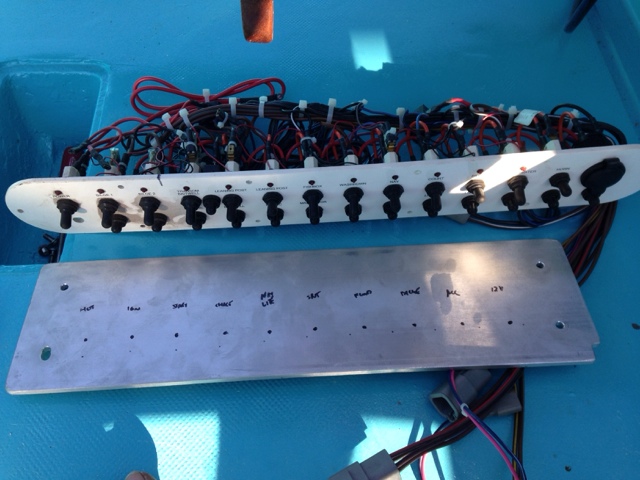
I was stalling on the boats nervous system.
The donor panel was another 10 year scrap stash.
This is why I don't get rid of anything.
The wiring was streamlined to the necessities,
of a small yacht.
Those two little dash mounts 
were a huge pain in the butt.
The wiring was more massive then expected,
leading to a change in the wires or the console.
The console lost,
and the steering moved forward a bit.
The end of school was
the start of Perich Brothers and Sister Boatworks.
Macey screwed on the junction boxes...
Jakob finished the soldering and heat shrink...
...and Jaxon started on the trailer fender mounts.
He really liked that grinder...
I'm in trouble.
Crude but effective!
We'll add step tops later.
The winch mount was also streamlined,
still need to build the V stopper bracket.
Jake installed the new dashboard panel,
and it was my turn to connect the color coded wires.
Holey Chit,
what a chore.
I liked the individual fuse poppers
rather than a single fuse panel.
We'll see how it ages.
Amazingly enough the wiring worked,
and the engine started!
Cooling water flowed,
always a good sign on a craigslist special motor.
Looks close but there's a ton of little things 
now that I'm being picky.
Until next time...
TP

17 June 2015

Killer Truck

This time I bit off more than I could chew,
here's a project that helped me realize some things can't be saved,
by me anyway.
This hot rod proved a shop with bitchin tooling,
means nothing without basic construction techniques.
Winchel's Rod and Custom's first attempt 
at the frame had the rails underneath the rear end.
A definite MC Escher design.
They settled with an almost rigid rear suspension,
leaving barely an inch of travel.
Let's make that no suspension travel,
so yeah full rigid.
Where to start?
This was a $500 rusty model a cab,
slowly attracting $1000's in work and parts.
The body had no substructure,
and these tacked patch panels made it less floppy.
Now the body could be mounted correctly,
or chopped!
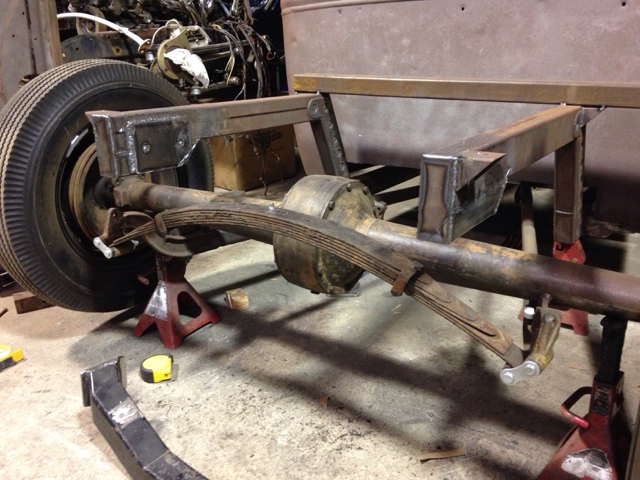
Their idea of body mounts was interesting.
You saw the bar above resting on the radius rods,
right in line with the imaginary driveshaft.
I'm sure it would have been modified later.
The front mount was equally as trick,
welded to the once rusty inner panel.
At this point the body was raised up about a 2x4 width,
this allowed beefier mounts to line up with the subframe,
while the grille shell lined up with the cowl top.
Now it was time to get the front suspension working.
The spring would click when bounced,
most likely cause it was resting on the frame,
that's without the driver and the rest of the car parts.
I've made original looking crossmembers before,
and this was the easiest solution.
The drop could be tailored to the car.
I was expecting this to go smoothly,
a quick cut and paste.
After removing the front crossmember,
the spring was finally free,
to settle 3 degrees the wrong way.
The decision was made to fix it,
nothing worse than spring bind on a suspension.
The repair was simple,
rotate these barely welded spring perches.
While I was cutting,
I noticed these crazy cracks in the casting!
The vice mark clues were easy to deduce,
the shop had torch bent the perches,
a bit past the comfort level.
Holey chit...
New perches were needed.
Especially since the insides were rotted!
If these broke,
the frame and engine basically scrape on the ground.
Not called a suicide front end for jokes!
The quality of Winchel's engineering was incredible,
following the same attention to design of the other cut out work.
I loved the sparing use of material.
Why waste a 2 foot section of miscut thin square tube from the previous try?
Just add an inch on each end!
And why weld both sides?
Nobody will see it,
especially when the outside is ground smooth.
Holey chit...
While the perches were shipped in,
the crossmember was fit and welded.
Yeah crude but effective.
It looked cleaner after the grinder!
Fat doubler plates beefed up the wishbones.
The perches were welded upside down,
so the spring wouldn't hit the tie rod.
Amazing this re-work was all done accidentally,
what if it wasn't fixed?
At this point the owner James had found another project,
and I would gladly give up the truck to another shop now,
to do the roadster later.
The race was on to get the truck out.
Earlier pics didn't show the rear sag.
Four inch spacers were needed to set it level.
The quick fix was raiding my junk stash.
This front bolt on crossmember would do the job,
especially cause the rear suspension used a 2" front spring.
The cheesy 2" tube crossmember was cut out,
and used to thicken the rear frame rails.
Definitely has clearance now!
The next shop can't say this won't be strong,
ugly maybe...
New bed mounts replaced the 1" tube structure,
which was reused for the fuel tank mount.
The last hurrah was pullin out the torch...
...and bend up these crazy headlight mounts.
I had to do something fun.
The new 7.00x16 tires helped out the stance,
but rubber rake couldn't stand the bed full of parts that will be added by the next shop,
Lone Wolf Chop Rodz.
Expected time to the road is 2 weeks...
A huge relief to let this one go,
and glad to have caught a few problems that would have sidelined James to the hospital or worse!
TP