29 March 2013

natural progression

The last swap we scored one of those crossbow pistols.
We couldn't resist!
Jakob & crossbow pistol


This thing has enough kick to easily lose the first arrow
as it passed through the target into the bushes.
Way different than the airsoft and bb-guns,
but a natural progression for inner city shooting.
jakob, macey and our zombie


Good thing we had the perfect target and a willing arteest.
Jaxon and the crossbow


The excitement was enough to get jaxon out.
perich brothers and sister


Good Times!

TP

28 March 2013

budget street rod TV cable

Sometimes the worst mornings bring out the best results.
Yesterday the wife and I got in a little spat,
and it gave me just enough focus to knock out one of the trickier projects.
In a way building is a great form of therapy!

ford 289/302/5.0 SBF


The AOD transmission uses a TV or throttle valve cable
to sync with the engine.
Most street rodders buy an aftermarket Lokar kit to solve this problem,
and while it works,
it reminds me of the cheesy bike parts.
You could guess that this is the route I wouldn't take.
ford TV cable


The stock Ford or Lincoln unit is a really cool design.
There is a little adjustment box,
and it really makes for an idiot proof assembly.
The biggest drawback is it's plastic.
Fortunately I had kept most of the important pieces.
These cables used cost more than a Lokar kit!
Lincoln TV cable


Last weekend the carb was modified to fit the bushing,
and the big question was how to hold the cable housing.
The best answer was with some scissors and cardboard.
scrap + templates


Spending time making good templates saves time remaking parts.
I was hoping to get this right the first try!
steel whittler


The bracket needs to be sturdy and exact.
a two piece welded design seemed more precise
than bending a one piece design.
AOD TV cable housing bracket


The bracket was mocked up a couple times and it fit perfect.
Even though not many people will use a 2-barrel 2100 carburetor
and stock cast iron intake manifold,
I figured it would be good to make a hard template.
There are similar mounting holes on aftermarket 4-barrel intakes,
so I can modify the base to fit those as well.
prototype template


After the standard rattlecan black,
the bracket was installed and the TV cable adjusted.
I was hoping it would blend in and it did just that.
The 3 little holes can be used for throttle return springs.
Ford AOD TV cable to carburetor


I thought about making a gusset to stiffen the bracket up,
but it doesn't flex at all.
pegged


Our old Lincoln Town Car used this same cable,
and I must have removed the intake 2 or 3 times,
doing the factory style tension adjustment method.
Of course it was a low performance car,
so I may do the pressure gauge check to get it dialed in a bit better.

anti-street rod ford 302 - 1940 ford coupe


Little by little the engine is more complete.
I've got a small pile of parts on order to help finish it up,
but it's way more fun to actually make something.

TP

26 March 2013

full moon sacrifice

The past week I've had a fling with that little 17 watt Sherwood receiver.
The 40 year old underpowered design had slowly grown with the garage,
I had left it running for almost a week and the sound had seemed to mature,
burning in those new electrolytics someone had soldered in.
The once overly heavy bass
had toned down to the warm sound most Sherwood owners had described.
It was one of those sweet relationships that sadly was doomed to failure.
Sherwood S-7100a killer


Hadn't I done this countless times?
Powered up the Dynasty welder and tigged away,
while listening to the radio?
Yeah I said radio I'm not totally pigeonholed in my musical interests!

The first couple tacks - no problem.
Than the filler beads.
Press down on the pedal and !!!!
...ZZT....ZZZIPPPKK....           ......
What the heck?
Only silence.
Ahh poop rocks.

Some urgent flips of the dials and switches,
hooked up the IPOD,
checked the fuse,
still nothing.
Grrrr.

The poor box was pulled down and torn apart.
I was expecting some sign of smoke or bloody residue,
but the insides were just as clean as can be.
Dang it.
powerhouse onkyo tx-8500


Fortunately the big Onkyo was laying in wait on the back table,
and was more than willing to get hooked back up.
The wife more than happy to see it leave the kitchen!
**********************************************

Peter Tosh - Burial - 16JUL79 - switzerland
bitchin version of a great song
**********************************************
For an unplanned review here it goes.
There's definitely a big sound difference between 110 and 17 wpc.
The Sherwood was perfect for mid-level background music,
just clean, sweet, almost blended sounding in a way.
The sound seemed a bit uncontrolled at the higher levels,
the bass getting a little rumbly at times.
Of course this was pushing 2 pairs of speakers!
The best thing about the S-7100a was the bulletproof tuner.

The Onkyo on the other hand cranks out clear uncolored sound.
Each range has good definition and the bass is sharp and deep.
At barely a quarter throttle it's almost too loud for a garage system.
The midrange does get a little shouty at the higher levels,
but that could be the horn speakers.
Fortunately there's a midrange dial in the 3 knob tone control.
The tuner has this locking feature and does seem to wander at times.
I'd love to hear this thing after a full blown recap.
vintage receiver killer


So what happened?
One idea is the electrical isn't fully grounded for a large draw.
I'll have to study that as it's not difficult to modify.

Most likely it was the high frequency tig start from the Miller Dynasty.
I never thought that as a problem until I read some stories online.
My old droid phone did get glitchy possibly from sitting on the machine.
I'm thinking the tuner had crossed the radio signals and shorted a circuit board out.
If the IPOD was playing instead it may not have been affected.
Don't really want to test that theory at this point!

I guess I'll be tig welding in silence from now on,
however there is an option to do the scratch-start method.

Anyway maybe it was better to kill the sacrificial $30 receiver instead of the others,
even though it was a sweetheart.

RIP little sherwood!

TP

25 March 2013

stalled

This weekend I was so ready to post
that I had finally started the engine.
Instead I sabotaged that idea by doing things in order.
1940 ford dash


The engine wiring was basically done,
but the dash wiring was a little messy.
Somehow I was able to pull all these wires out of there!
wired


You can see I had a thing for black wires back then.
That's why there were multiples.
If I thought that a wire was bad I'd just run another one.
Some were gauge wires that I'll have to redo,
but since it's a different engine the locations have changed.
template


Before there had been a series of hidden switches under the dash.
Over time the switches were loose,
and really I'll admit I forgot what the secret starting sequence was.
busted


Actually I did remember,
but this dang busted switch had tricked me,
as nothing was working right.
control panel


It was obvious what was needed.
A couple minutes with the grinder and some scrap aluminum,
and a little control panel cleaned everything up.
wired!


All the wiring was then rerouted.
What a rats nest huh!?
It's actually not too bad if you've studied it for a couple years.
The bottom fuse panel is fed by that top right black wire,
which holds the master fuse,
which then feeds all the basic switches - lights, pump, ignition, fan etc.
The junction box is routed to the light switches on the right side,
than back over the jumpers to the light outs on the left.
The ballast resistor isn't used with the electronic ignition,
but I'll leave it there in case I change back to points someday.
That little relay box is for the starter switch,
which I still don't quite understand why it's needed!
Like I said it's basic!
I'll bundle the wires with zip ties later on,
after the gauge wires are installed.
exhaust RTV


At some point I realized the engine wasn't going to start.
This was the perfect time to finally seal up the headers.
I like to use straight RTV with no gasket.
The trick is to bead up the header flange,
with a light coat on the block,
and let it skin over for a couple minutes.
Than bolt on the headers but not too tight.
Go get distracted for a bit,
than come back and do a good torquing.
Make sure you file the flanges and scrape all the paint/gasket off.
The most important step is letting it cure for at least a day,
or you'll blow out the RTV.
exhaust RTV


The wild card project is the transmission TV cable.
I don't want to use a Lokar aftermarket version,
as I've got the original Lincoln/Ford cable,
and I also really like the simple design.
holey chit


Here's part I of the "how to rig a TV cable"
The first problem is the 2100 carburetor is not set up for this unit.
The solution was to file out a thick SS washer for the bushing...
bushed


Measure the exact 1:1 location on the throttle lever...
(thanks Ricky for the tip!)
precision


Precision looking tool there eh!?
1:1


Mark for a trim...
more precision work


The final 1:1 measurement was adjusted with a little gap,
and everything was tigged up.
fitting


Now the carburetor is set up for the Ford TV cable.
TV modified autolite/motorcraft 2100 carburetor


Here you can see how the assembly fits on to the new throttle hole.
I'll make a little bracket that holds up the sheath housing to the intake,
and hopefully the box will be able to adjust itself correctly.
partial TV cable linkage


That was a huge step as now the carburetor could actually be mounted.
Something would seem wrong welding on a gas filled carburetor!
95% complete


Here you can see there's the last hot wire going to the coil positive,
which also connects to the voltage regulator power side.
The valve covers are also finally bolted down and the oil is filled.
busted fuel pump


In a last rush there was a bit of hope to get it started,
until I was viciously reminded that the fuel pump was dead.
Aren't these supposed to last more than 7 years?
Funny thing is,
all I needed to do was swap out the pump and the flathead may have stayed.
Instead I tore up the guts of this car just to fall back to the original problem.
STD list


The best part is my STD (shit to do) list is one page.
This includes some really easy things,
which offset the time consuming or expensive things.
It's an illusion as "filling oil" has the same space as "build a shifter".
Now instead of getting the glassy stare,
I can pick a project and get it crossed off.

Okay more later...

TP

23 March 2013

love & hate

The rusty "tres huevos" 40 project has been languishing on the side of the garage.
That cheapy tarp port was one of the best investments,
as this thing has been totally dry in the past rains.
I had even sanded the grey coat down to some bare metal,
and the steel was still shiny.
patient


With the green 40 so close to leaving the garage,
there are a couple dirty things I'd like to do before the swap.

The other day I was in the mood to sniff some epoxy fumes,
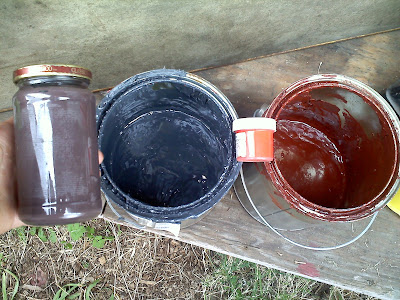
and I had an idea of mixing the grey and red primer's.
Wouldn't you know it the color is the perfect base for the planned patina finish...
red + grey = poo brown


What did I say up there?
Patina?
Bring up this word with a group of internet hot rodders and it's like throwing
a bloody steak into a school of sharks.
The big misunderstanding is that all cars need shiny paint,
which is dead wrong as some cars are just too rough to get it.
Like this one!
Plus who wants to fret over little kid scratches and nicks from use.
In the old days flames and pinstriping were the perfect way to hide wavy bodywork.
These days it's layers of fake paint wear.
****************************************************


Bob Marley & the Wailers - Simmer Down
*****************************************************
This week a guy came to pick up this old transmission.
He wasn't too familiar with cars but his dad was.
They liked the green 40, 
really liked the 29 RPU,
but wholly mackerel when he saw the rusty 40 he almost cried.
"that's what a hot rod is supposed to look like!"
Hey I'm not gonna argue with the uneducated masses!
1940 ford coupe patina special


So after an hour of sanding the brown base was rolled on.
Dang talk about fumes!
Now it can cure for a couple days in the sun...
Stay tuned for more...

TP

21 March 2013

big n littles

I've been on a mini-mission for the past couple months now,
and this evening marks it's completion.
Can you tell from the picture what it was?
1940 ford coupe


Finding the right tires and rims is a crapshoot.
Many pictures were studied and questions asked to make the best choices.
Most owners are happy to talk about there cars,
even if you are trying to find out the size not to use.
Just don't tell them!
205/65R15 70's street rod tires


My initial problem started with these ebay rims.
The seller had described them a bit differently than what arrived.
I left them in the box for a couple weeks and didn't notice until too late,
even though the cheap price and free shipping made them cost effective to keep.
partial front wheel selection


A used set of 205/75R15's were scrounged on craigslist,
and almost immediately it was obvious these were not the right tires.
Way too wide.
On top of that there were no hub cap nubs on the rims.
Chit.
Good enough for rollers,
but if you look at any of the old pictures,
there's never a good front quarter shot.
The wide wheels made the poor 40 look like a 70's street rod!

In a stroke of luck,
an almost new pair of 195/65R15's were found on good old craigslist.
Way cheap too especially for Goodyears.
I guess they were too skinny for a tuner honda!
(you can see the width difference in the pic above)
studebaker vs ford steel rims = 4.5"x5 lug


After that I found out how hard it is to find basic 50's ford car 15" steel rims.
Years ago I gave away a complete set of these ford wheels with tires.
In a bid of desperation a pair of studebaker rims were found,
but again there were no dang hubcap nubs.
At least these were the right width though at 5.5" wide instead of 6.5".
These may go on the rusty 40 if it gets front disc brakes.

At the Big 3 Swap a guy wanted 180 for a pair of bare beater rims.
Another seller wanted 600 for 4 rims and decent tires!
What the heck!
The last day I scored one for cheap cause the guy had only one.
Last week the red one was sent by an ebayer to seal the deal.
enlarging center pilot hole with grinder - steelies


Finally the time had come to test fit all the goodies.
Wouldn't you know it,
but the center hole was too small to fit over the disc brake rotor.
The studebaker rim had fit fine,
but not the ford.
modified vs unmodified ford rim for disc brakes


Fortunately I was in the mood for grinding,
and the holes were whittled out with the good old grinder.
No problem...
hack job paint prep


Now that I was on a roll it was impossible to stop.
The rims were wire-wheeled and even sanded a little bit.
A nice drippy coat of rattlecan black was sprayed on.
best rattlecan paint - sherwin williams controls rust


I really like this Sherwin-Williams "Controls Rust" paint,
but it doesn't like to be sprayed at dusk.
Usually that's my luckiest time to spray as it evens the sheen.
Not this time as it really fogged up the shine,
and the paint stayed wet long enough to drip.
At least the old RPU was the perfect drying rack.
hot rod drying rack


This morning I rushed and scour-padded the wheels to get a better final coat.
I'll tell you again this is some good sticky paint.
This was a good chance to blend in some of my rushed work.
What can you expect with that rust remover wire wheel!
scour pad paint prep


The second coat came out way smoother.
This paint likes the heat to tack relatively quick once it hits the metal.
Remember our half-tire stools?
Another great use for them.
stool time?


The new tires were assembled,
and the old wheels disassembled to flip.
wheel party


I couldn't wait to try on the new shoes...
Way better now that the tire isn't flush with the fender!
fat fendered ford


As you can tell from this rambling post,
this was the catalyst I needed to get motivated on this old heap.
I had to recognize it was an actual car,
not just an endless series of projects.

After 2 months on jackstands,
it was time to roll it outside.
The junk underneath didn't pile up too bad...
project almost storage unit


The kids even came out to help...
perich brothers and sister - Macey, Jakob & Jaxon - 2013


The suspension may be a little high for some of you,
but it's way lower than it was as a flathead tractor.
Now it has that moonshine rig stance.
1940 ford coupe - hot rod rake


There's over 3" difference in the big and littles!
I'm stoked to have the front hubcaps off the wall and on the rims.
1940 ford deluxe coupe


Now I can finally show the front quarter shot.
It will be interesting if it settles after 100 or so pounds of fluids (gas/coolant/moonshine)
and some driving time.
1940 ford deluxe coupe - moonshine rig


Well thanks for slogging through all this.
It's one of those small wins that makes the fire burn a little hotter!

TP