30 April 2011

tres huevos - another patch panel

My current goal is to fill in the holes that I see when looking at the pictures at home.

holey chit


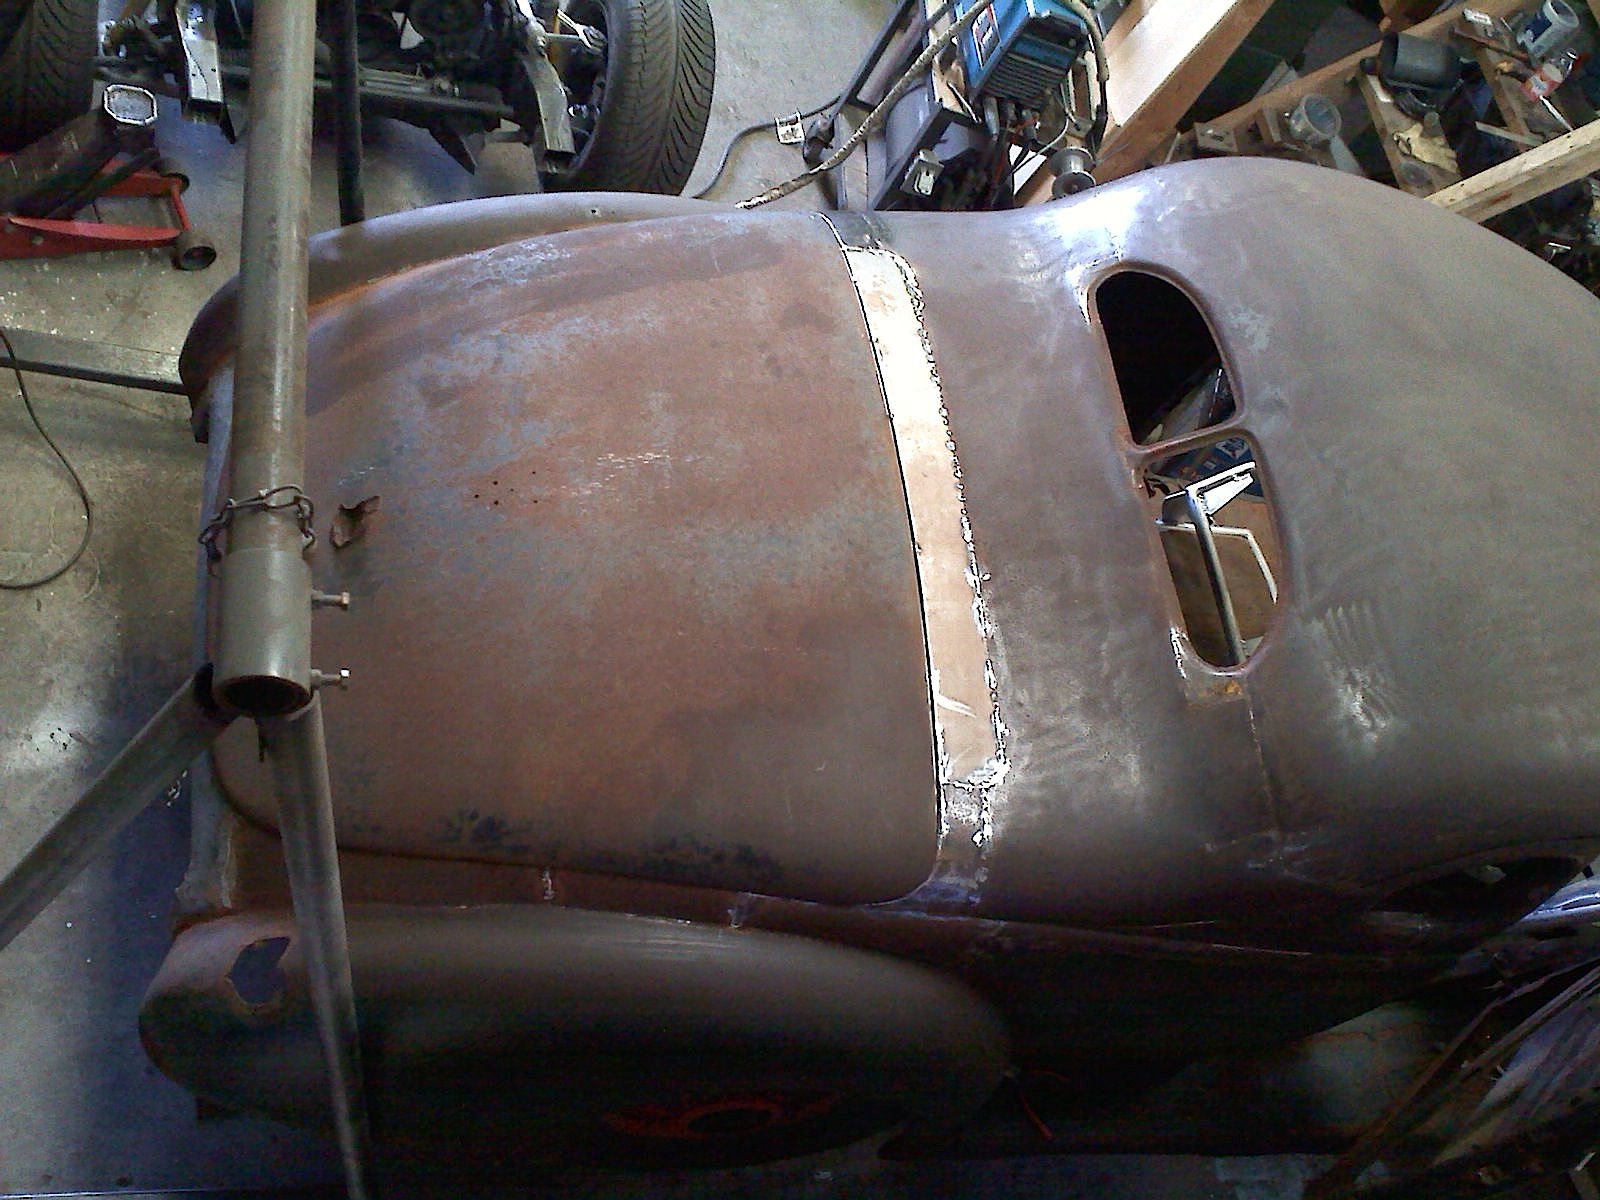
This is an older shot, about a week or so ago,
but there was one sliver that has been tugging at me.
Last night I went to sleep thinking of how to do it,
and today after finishing a small work project,
I was wound up like a toy tin car ready to go.

marking lines
please be symmetrical


First was finding some scrap large enough to fill 42" x 5".
I would have  been happy with 2 pieces 21 inches long.
No luck.
The 4x4 piece thats been getting kicked around the shop finally found its first use.
Fortunately my brother invested in a nice stomp shear!

A line was marked following the decklid,
I was betting that the decklid was symmetrical left and right.

trusty patch panel tools


Using the same hammer tools I showed you all a couple days ago,
a small lip was hammered out.

wow
looks good at 640x480!


It was close enough to work.
The last inch or so of the body was really rusty,
and relatively flat,
so this patch panel would extend up higher than the little corner pieces.

tacked in


It was easiest to tack the patch panel to the decklid,
securing a decent gap,
than fitting the patch panel to the body.
This is the easy part as the little mig tacks don't warp too much.

half-welded


It is tough to MIG it all though as its relatively thin,
and my mig machine is a Miller Vintage,
basically a 250, definitely not made for sheetmetal.
Plus I like tigging anyway,
so in little runs it was half buttoned up.

$$$$$$$$$$$$$$$$$$$$$$$$$$$$$$$$$$$$$$$$$$

let's take a little musical intermission...
(sounds best loud)


dead weather - cut like a buffalo - good chit

$$$$$$$$$$$$$$$$$$$$$$$$$$$$$$$$$$$$$$$$$$$$$


Oh yeah,
this is a tool I figured out when this project began.


hand shrinker (tm)


Someday I'll get a shrinker/stretcher machine,
but this little thing does the job for now.

hand shrinker (tm) in action


Since that hammered lip makes the patch panel stiff but flat,
or actually inverted the wrong way a little,
the perfect lip needs to be mashed up a little to allow it to curve down.
Later on I'll hammer it and maybe make a relief cut,
or just weld a drip lip, we'll see.

temporary support


The hinges are attached to a temporary tubular support,
used when the body had no strength,
actually when the rear part was nonexistent.
Unfortunately the tube is right near the new weld seam,
and its tough to hammer, especially with the decklid in the way.

Next time I get a chance that will all be removed,
and a new hinge support/body stiffener/inner wheelwell frame
can be figured out.

spiders eye view


While its far from done,
not having to imagine that piece gives me some much needed brain space!
Now this is what I was hoping a chopped 40 ford coupe looked like.

un-holey chit


Ouch,
1 step forward, 2 steps back.

If anyone wants to send me a decent digital camera,
I'll be happy to use it!
For now, the blurry cellphone shots...

TP


Leavin ya with some more...


Dead Weather - "will there be enough water"

Thank God for bands that sound better live than studio!

29 April 2011

armageddon vehicles

Everyone knows 2012 is coming up quick.
So start looking for an Armageddon Vehicle.

4x4, non-computerized, gas or diesel - your call,
just double tanks, space for all your stuff, family and friends,
supplies, trailer hitch, ram bumpers,
bulletproof panels, silicon filled tires, small armory...

armageddon vehicle
70's ford quadravan 


Perfect!

We had an '84 ford quadravan a couple years back.
It looked similar to this one.

80's ford quadravan


But with smaller tires, rollaway awnings on each side, rack,
 and not the extended body.
It was badass.
With a 351 windsor and a c-6 tranny getting about 8 mpg freeway,
we couldn't afford to drive it.
I sold it to a guy in palos verdes,
and as soon as he saw it, he said "my armageddon van"!
Funny as I had thought the same thing.
Oh well.

While driving around OB the other day,
I saw this thing, and was pleasantly reminded of the importance of one of these vehicles.

crazy jimmy


Holy chit talk about bad ass, even it is GM.
I'm on the hunt.


TP

27 April 2011

how to - quick patch panel repair - 40 coupe

It took me an hour to get jump started after work yesterday.
Actually it took me an hour,
a mexican bottled coke,
and this '76 GD show.

Grateful Dead Live at Community War Memorial Auditorium on 1976-09-27 : Free Download & Streaming : Internet Archive

This is a good show to work to as well.
I only listened to the second set (15-21)
and was able to get all this work done.
The "franklin's tower" at the end is a 17 minute ripper.

*****

After seeing the array of pictures,
looked like a "how to" was in order.

This rusty 1940 ford coupe is the perfect project to practice on.

rusty, misaligned, missing


The other side was easy, just simple strip.
This side seemed alot tougher.
If you look closely,
the door reveal is about 1/2" higher than the cowl reveal.
The stainless door trim is also dropped that same 1/2" on the cowl.

So start by cutting it all out.

uh oh


Now get all the tools and some sheetmetal scrap prepared.

e-z patch panel kit


Other than some tin-snips,
this is about all you need.
90% of my hammering is done with that hammer.
It's a PROTO hammer with a polished soft dome head on one side,
and a bar like head on the other side.
It's extra long and is bitchin.
I don't let anyone else use it.
Seriously.

Now make a cardboard template and make your patch panel.

patch panel installed.


Tack in a couple places to fit right,
and weld it in.
Prewar FORD steel loves to be welded,
even when it looks rusty.

shiny patch panel


There's still some hammering and weld filing to do,
but now its almost better than the rest of the car.
And at least the reveal line somewhat matches.

Way to shiny though.
So let's go to the paint cabinet.

mis-lead-ing


Bet you guys wondered whats in here.

surprise - huffer cabinet


Not to much left really.
But that middle shelf has the rust tones we need.

proper patina base


Layer the primer grey, the black, a splash of metallic burgundy,
with a rustoleum bronze cover.
I didn't have time to wait for it to dry,
but after some scrubbing it will blend right in with the rust.

A year of seeing that gaping hole,
an hour and a half  of work is all it took.
Only about 35 more of these patch panels left!

Some patch panels I like to make a wood form for.
Usually there's not much hammering on the wood,
its more of a guide to fit on the bench.

top cap for distributor house


I still need to finish the outside edges,
but at least the main part is wrapped up.

At this rate,
the cowl/body should be strong and complete enough to figure out the doors.
The hinges are just temporary weld-in hinges,
I used them just to figure out the pivot points.

doorless


Remember,
if you get stuck or have a hard time starting up,
stream this show. loud.
I'll even send you a CD if you write me!

ripped picture
of mexican coke


Oh yeah,
don't forget the mexican coke too.
Good chit.

TP

26 April 2011

tres huevos II* - 40 coupe - half-baked patch panels

I am cursed.
For over a year I was able to stifle my addiction for the 40 coupe project.
Sure I redid the old roadster pickup and learned some german BMW engineering,
but those projects were easy compared to tres huevos II*.
Now the addiction has gotten a hold of me.


massaged and oiled


After it was safe inside the shop,
it was difficult to not notice the effects of sitting outside in the elements.
Even though it was covered with a tarp,
the salt air just hammered away at the unprotected already rusted steel.

One night I seriously contemplated getting some "Ospho-rust converter" and coating it up,
than roll some of that grey marine epoxy on it.
I thought about it so much that evening I didn't get anything real done,
other than sanding/scouring the body and getting a bunch of rusty dust everywhere.

So the next day I decided to remove the headlights for some reason.
They were rusted on so I got some "Kroil" spray oil and squirt a little around the bolts.
The surrounding sheetmetal soaked up that oil,
it loved it.
Like lotion on dry skin.

An hour later,
most of the  car was coated with Kroil.
I had a scouring pad and scrubbed the chit out of it.
After the scrubdown I wiped the body off with an old rag.
That nasty orange rust powder had transformed into dark brown,
the weld seams turned shiny silver,
and the original black paint was black again.

Half-baked 1 - ran out of oil and time!

who needs paint


My brother thought I was crazy,
as it won't be paintable any time soon.
But this car looks kinda cool with no bondo, obvious weld seams etc.
It also helped me to focus on the priorities,
as I was beginning to get off track a little.

Looking at these pictures I  realized I needed to fill those gaps,
so I started to knock out the patch panels.

little patch panel


This rear one is really important,
as it will really show the flow of the body.
The corner was tough,
but I had already done the passenger side,
so knew some tricks.

lip


The hard part was hammering that lip to match the decklid,
while matching the curve of the body.

Halfbaked 2 - I didn't feel like doing the center part just yet.

little cowl patch panel


Next was the little piece on the corner of the cowl.
Anyone who comes by would point out that missing 1" x 4" chunk,
even though the door bottom is 30x larger.
This was an important piece as it stiffens up the cowl for the doors,
which aren't really hinged yet.

Half-baked 3 - still need to do the door!

distributor house


Than tonight I started on the firewall behind the distributor.
These prewar flathead cadillac engines have a typical GM distributor placement,
but alot taller.
I was in the mood to work and didn't take any progress pictures.
Lame.
Since I didn't really finish it,
I guess these are the progress shots!

2 pieces of the puzzle - 5 left!


Its tough to see but there's actually the back half-cylinder piece,
and a top piece that matches the cowl top and the circular piece behind.
Tons of hammering - fun stuff.
Hopefully tomorrow I can remove the distributor and finish the inside welding/grinding,
and add the outer triangles that fill that little black gap there.

Half-baked 4 - the rest of the firewall!

Connecting this center piece stiffened up the cowl,
which was kinda floppy.
Floppy enough that the doors can't be properly hinged until this part is done.
The whole car is like building one of those domino creations,
layer upon layer.

same but different


It's funny how many hours this thing sucked up,
and to the untrained eye it looks the same,
but it isn't.
If I didn't need money or sleep,
I'd be working on this right now!


TP


* tres huevos = 3 eggs.
I had a '36 coupe project a long while back.
It was a similar condition body, similar custom frame, chop and section/channel.
In it I found a little birds next with 3 dried up eggs in it,
so the coupe was nicknamed "tres huevos".
This 1940 coupe is the second generation of that car,
everything I learned is either better or just more,
so let's call it "tres huevos II.
Funny how I happen to have 3 kids too...

24 April 2011

our double rainbow

Most of us have seen that double rainbow video on youtube.
Well we have a little one in our house.


She was so into it.

This next one is funny,
as she was imagining the green lava as GUMBY.

gumby love


lava lamps and kids.


Since todays april 24th,
here's the rockinest "Scarlet - Fire" by the Grateful Dead,
a crazy 25 minutes

April 24, 1978 - Horton Field House - Normal, IL
(click on 12 to 13)

This is a solid show to work to!


Good times...

TP

22 April 2011

hurtlocker truck - stripper time

Remember this thing?
56 chevy truck


Yep,
still peckin away at it.
We're at the bodywork stage,
patch panels and dents.
This thing is so caked with paint, 5 or 6 colors,
it was tough to know how to tackle the sheetmetal problems.
Didn't think Ken wanted to strip off the paint with scouring pads or chemical stripper...

So with the help of some chainfalls...
chainfall fun


last night the body was pulled off and all the pieces gathered up...
chevy in a chevy


to load onto my brothers truck the next day.
This little flatbed has hauled alot of stuff.

loaded TJ style


Some day he'll get some heavy duty springs!
We figured one trip there,
but definitely 2+ trips coming back.
el dorado sandblasting
(619) 696-0700


We take alot of stuff here.
Actually my brother does with the boat business.
I have a '27 roadster body that was blasted and epoxy primed,
and had never seen the stamping stretch marks in the steel.


The Hurtlocker Truck will be stripped and coated with black epoxy primer.
I'm sure it will uncover a ton of bodywork,
without the 5 coats of paint and bondo!

Well,
while we're talking about strippers.
suicide girl on the left
perichbrothers (and sister) link over on the right
the right!


Just want to say thanks to the HateFuckers out east.
Crazy bunch these guys.

Hate Fuckers

There's a link on their site,
and I get alot of hits from it.
I laugh sometimes cause my blog gets so, well, dry, in comparison!

Chow.

TP

21 April 2011

tres huevos - home sweet temporary home -

Finally.
Get that german car outta here...

bmw 1600/2002 - night moves


It took some coaxing,
like leading a donkey with a carrot on a string.
But it finally left to the outside under its own power.

1968 bmw 1600/2002 outside


For now it's still crippled as I reinstalled the old spent center-link not too tight,
and still needs some basic engine tuning, burn out the old gas etc.

multicolored bmw


There's a certain patina to it,
 like it was rebuilt inbetween rally stages on the european circuit.
That rear bumper was started about 1130pm, and looks it!

need more lights


I am happy as other than the $60+ center-link, and some spray paint,
there was no real money involved,
just stuff that I had stashed away - and time!
The car is really solid, just needs some wiring and small stuff,
like insurance,
and I think it will be a decent town-car.

1940 ford coupe - stools back!


The byproduct of the BMW leaving was the 40 entering.
I have some other obligations,
but it will get its time.

TP

20 April 2011

R.I.P. - Papa

Today marks the 4th year of the death of my grandfather,
the "Perich" in perichbrothers!

Stanley "Papa" Perich


When he was younger,
he rose up to be a Chief in the Navy.
During WWII and the Korean war,
he was one of the guys on the aircraft carriers
that put the wrecked planes back up in the air.
(aviation structural mechanic, I believe)


sub-killer


Must have been intense doing the sheetmetal etc.  fixes on these planes during the wars.
Wonder if its a little in my blood too!

I'll have to take some pics of these little ships he helped build during his last working years.
They were exact 4 to 8 foot miniatures of ships used for radar exercises.


sneaky sailor


He had tons of stories hopping trains and living on onions and potatoes as a kid,
during the depression.
Then joining the "CC's" or Civilian Conservation Corps, planting trees and building roads,
working for $5 a month ( his parents were sent the other $25!)

Typical of teenagers back then,
he enlisted in the Navy with a false birthdate, too young.
WWII helped out with that.

nana and papa


I'll have to get the exact story later,
but somehow he married the town hottie  ;) from his hometown in Minnesota,
dragged her to San Diego, and never left.
Fortunately for us, Nana's still around.

He always said he hated the cold!
As a kid,
he'd have to trek out in the snow to the food locker,
and dig out the sauerkraut and blood sausage that got them through the winter.
Yum.

nana, papa & macey


When I grew up,
he wasn't the hard-ass that my Dad and Uncle Steve knew!


pop's truck - 1957 chevy


Many  years cruising around with him in this old pickup.
As a kid, we'd go fix the widow's and church friends house problems,
plumbing, carpentry, general handyman stuff, dump runs...
I'll be getting the truck back on the road soon!


papa and jake


Although we lived in Ventura 200 miles away,
I am glad we had our 3 kids early enough so he knew his great-grandchildren.
One of the main reasons we moved back to SD after he died,
as it helped me realize the importance of family,
although it is farther away from my wife's family.

I'm gonna end this post though with a pic of Papa and his brother Joe
during communion.

stan and joe


Remember this was a financially tough time,
but being a very catholic family,
they really looked sharp in their suits.

Than seeing this snapshot in time,
4 generations later.

jaxon & jakob


We miss you Papa!


TP