24 June 2012

june bug sunday

Sundays have been set aside for the green 40.
While there are many other things I should do,
I can't afford to let it stagnate into a long term project.
We haven't come up with a proper nickname,
but it looks like a June Bug.
june bug


Last week I mentioned it was time to swap rear ends.
The old banjo could be used with an open-shaft kit,
but that $250 got an arguably stronger 8" with better gearing,
and the extra will go to modifying the driveshaft .
1940 ford coupe


My gamble was hoping the '68 mustang rearend would fit.
I had measured and remeasured but don't trust numbers as much as the real thing.
1968 ford mustang 


And a parting shot of the stock rear end setup.
stock 1940 ford rear end


(*)(*)(*)(*)(*)(*)(*)(*)(*)(*)(*)(*)(*)(*)(*)(*)(*)(*)(*)(*)(*)(*)


Jimi Hendrix - live stockholm 1969
Wow what a great video.
I've seen snippets of concerts,
but this one is uncut goodness.
Cool to see them tweak the stacks.
(*)(*)(*)(*)(*)(*)(*)(*)(*)(*)(*)(*)(*)(*)(*)(*)(*)(*)(*)(*)(*)(*)
dropped rear


The rear end dropped out so fast,
it actually is taking longer to write this post.
test fit


The 8 inch was rolled under and it looked like the perfect fit.
Depending on the rear tires,
there could be an inch to spare on each side.
A definite relief.
Now I'll have to mock up the new wishbones and make some bracketos.

More to come.

TP

rays

Yesterday I had a couple hours before the wife went to work.
Sometimes I'll waste that time but yesterday I had a mission.
subrails


These subrails were cut out of some scrap square tubing.
Yes that slice in the corner was closed up you'll see.
holey chit


This was one of the gaps I've been wanting to close.
First that subrail part was needed to have something to connect to,
and I've been procrastinating on it far too long.
subrail installed


It looks like an easy install but there were a couple glitches,
the pitfalls of hi-tech equipment.
easy access


The space was so tight,
that I used the tail light holes and the fuel filler holes as view ports for welding.
The problem with that is the sensors on the auto-darkening helmet are blocked.
stool time


So yes there is always a reason to have the trusty passive welding helmet.
It was funny cause I'd weld,
than wait for the lens to lighten.
patch panel


I came back to the shop later on with the kids,
and whipped out some templates for that space.
That bead roller makes everything so easy.
stool time


Now it sucks cause I hammered a reveal in those first patches.
Is it worth changing them to match?
Not right now.
inner fender well patch


With this section done,
there's only 2 holes in the front part of the fenderwell,
and the rear area.

So close...

TP

banded - how to widen a rim

Here's a little experiment I did a couple days ago.
A good "How To" post!
50's stock ford rim


Since I'm making the 40 a resto-rod,
I'm trying to find radials for 16" rims.
The tires need minimum 5.5 inch wide rims,
and all the old rims are only 4.5 inch.
prep


I had seen an old friends dad do this trick on his '58 pickup,
so this was the perfect opportunity to try it.
This rim had a little bump in it so it was a good donor.
pieces


After some careful cutting I had the lip removed.
Then a strip of 1/8 x 1" flatbar was curled up.
clamp


Here you can see how important those nubs were on the welding helmet!
perich brothers (and sister): pedicles

******************************************************************


Alabama Shakes - Hold On

********************************************************************

The toughest part was matching the ends.
clamped


Than the lip was tacked on...
lipped


I took a little too much faith in depending on the roundness of the rim.
Next time I'll have a rear end to spin it on to double check.
tacked


The rim was carefully TIG welded both sides.
This took the longest.
banded rim


The rim seemed OK.
An air check with some soapy water still needs to be done.
widened ford rim


Here you can see that dink on the top of the rim.
spin tested


I took it home and spinned it on the rear end hub,
and dang it was almost perfect.
The bump in the unmodified lip just needs to be hammered out.
helper


So now it looks like I'll have to do at least one more if not the other 3.
I may go 1.5" wider at the rears though.
Is it worth the 3 hours per wheel?
To me yeah it's better than spending over $500 on repop rims.

TP

23 June 2012

no limit

Not much has been easy bolt-on stuff with Ken's Hurtlocker truck.
His heart was set on a forward hinging hood,
and I had an idea to use some junkyard car hood hinges,
cause I'm a scrounge.
hurtlocker truck


Ken found a bolt-on kit from No Limit Engineering,
and other than the fact that the front end valance part had to be modified a bit
cause the front fender area is all welded up,
this was one of the smoother projects.
(other than needing get some shims in to line up the hood better)
no limit engineering hood hinge kit


The design seemed well thought out.
I'm not a big fan of square tubing,
but there is a reason to use it.
Cheap, light and stiff.
hurtlocker truck - 55 chevy


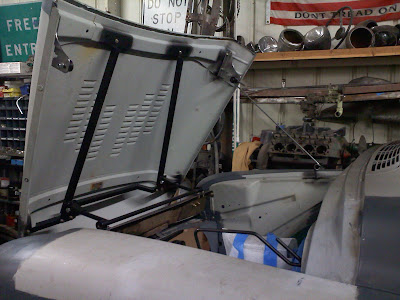
So here's the hood shut.
It took a while for me to figure out how it opened up.
flip hood


The hood uses the stock front latch,
and is pulled forward like this.
craziness


Then the hood flips up like this.
It is crazy!

TP

20 June 2012

bomber

Took the bridgestone down to TJ yesterday.
mb-3 in TJ


This was a quick run and I was late so I hauled butt down there.
Not too much time for pics.
It was actually a great ride through TJ traffic,
than down that hill.
The ride back was a little sketchy,
those big trucks don't really care about bikers.

150cc motorcycle


I've been wanting to get a picture of one of these motorcycles.
There are tons of them buzzing around,
very rarely parked.
This one is a random brand 150cc,
but Honda makes one that is really popular.
Hard to find in the States though.

$15


One of the perks of riding the bike is saving about $10-15 on taxis.
This is what $15 got me at the store!

TP

raiders of the lost ark

After almost 6 months,
Sepp's Hemi is finally on the way to Austria.
Sepp's Hemi


It was a strange arrangement,
cause the shipping was set up through a 3rd party in NY.
I had no idea where it was exactly headed.
raiders of the lost ark


The driver had a little barcode sticker that had the info,
that was it.
It kinda reminded me of that Indiana Jones movie,
when the artifact is stored in that giant warehouse.
just in case


While I was sure the shipper wasn't going to find the SEPP address in austria,
figured I better at least put a real address on the box.
You never know.

truck


So off it went.
Sepp in Austria


Looks like Sepp is ready for it!

TP

18 June 2012

fathers day 2012

I had all kinds of plans for Father's Day.
Why they didn't pan out I'm not quite sure.
Still was a fun day hanging out with the kiddies.
trusty A-frame


One thing on my list was mounting those motor mounts.
I thought it would be a quick 4-holes and voila.
Nope.

ford 302 motor mounts


Here you can see the positioning of the block in relation to the flathead.
That big hole with the 3 little holes around it is the flathead water pump mount.
Basically the front of both engine blocks is lined up right behind that hole.
Luckily the oil filter screws in perfectly but I didn't get a picture.

302 motor mount


This is what took so long.
I thought the motor mounts were symmetrical,
so had positioned them the same on each side.
After struggling with lining up the engine longer than I care to mention,
it was time for a chelada break and some measurements.
Well of course the passenger side is about 3/4" forward,
problem solved.

5.0 exhaust manifold


The stock Lincoln exhaust headers even fit on the passenger side.
The drivers side will fit after a little modification around the column,
but I've got some changes to do on that side first.
Yeah those headers are a little ugly,
but I like the design,
as the runners are short and go to that big pipe quickly.

302 tucked into 40 ford coupe


With the engine block setting as forward as possible,
the firewall is clear of the valve covers.
The engine is set a little high in the back as the transmission isn't attached yet,
so the firewall hack job could still be justified.
ford in a ford


Now that the engine is set up,
it seems like the next step would be figuring out the tranny mount,
but that isn't the case.
1940 ford coupe


The original torque tube is in the way,
which means the rearend should get swapped out first.

At this rate I should have it done next year.

TP

17 June 2012

liar's club - little helpers

What can you see in this pile of scrap?
Let's play "Liar's Club" and see how long it takes to figure it out.
scrap


After about an hour I had most of the essential parts.
It may have been 2.
Very tedious.
liar's club


Each one had 5 individual pieces,
for a total of 65 parts.
Sure 13 were the eye bolts,
but even they had to be trimmed to make hooks.
christmas ornaments?


A little bit later the pieces were assembled,
and they were stashed away for safe keeping.
Figure out what they are yet?
stashed


In the meantime,
Ken had been working on the hurtlocker truck seats,
and we also finished off the old grand dad bottle.
Time for a new one!
empty old grand dad bottle


I will spend a c-note buying some old speakers or stereo equipment,
but I am too cheap to buy these things at 4 for $30 or so.
The fact that I will spend a couple hours building them justifies my other addictions.
sheet metal clamp in action

If you haven't guessed it they are sheet metal clamps.
I ripped off the idea from many others,
and modified the design to fit my materials.
These should have been made a long time ago.

Stay tuned for the project(s) they are needed for,
it's gonna be a fun one.

TP