31 August 2011

armageddon stick

I think we all need one of these stashed somewheres.

hooked baseball bat


Holy Chit that thing looks plain wrong!

perich brothers (and sister): home protection - mace

TP

29 August 2011

back to square one

The Wasp left today,
so I treated myself to a couple hours of shop time.
(I'll post the last Wasp update soon.)

After making some quick cardboard templates,
experimented with the driver side.

strip


Rusty sheetmetal was cut out,
but I didn't want to put sheetmetal back in.
So instead of hammering the plan was to cut and weld thicker steel.

tacked


If you ever want to know the trick  to weld 1/8" steel to air,
than come by the shop.
Lotsa tricks up my sleeve.

repeat


It worked good enough to do the other side.
Lots more air on this side though.
(I wasn't about to restructure the first bend until the inner piece was in,
too much chance to cave in the whole A pillar)

So with that the second panel was cut out.

cut grind weld


This piece went in quick.
Like it wanted to be attached to the car.

square one - drivers side


The other side should be quick too right?


passenger side 


Nope.
A little coercion and it finally gave in.

 square one - passenger side


So now it's basically at the point where we were before the rust cutting last week,
but with nice new 1/8" plate not rusty sheet metal.

The inside piece is going to be tough but the dash is going in first.
Well filling in those gaping holes is going to be tough too.

access


Fortunately there's enough access on the back side.
But not tonight.

switcheroo


Trippy when the nastiest part of the car,
turns into one of the cleanest part of the car.
It's like magic.

TP

(rebuilding door jambs 1940 ford coupe)

fun with pipe

Let's have some more fun with pipe.

bent pipe


This was one of my brothers jobs.
He's the opposite of me,
as he'll spend the money on proper materials and outside labor,
like bending this 5" pipe.

smile


This was one of those,
"can you just cut it out really quick before you go home?" jobs.

The next morning we checked out the lucky recipient, a tugboat.

rubber rainbow


Yeah, looks like fun, huh?

I told you when Pikachu works,
I'll do the fitting,
and he'll do the welding,
than I'll assist him, grind between passes, rub his back, just kidding.


best seat in the house


At the beginning of the job,
it was kinda sketchy sitting up on the bow,
high above the water while working.
Than as the hours passed by it was like sitting on a chair.

Same with fitting that piece,
there was no cutting on the boat,
so I had to walk back and forth to the pier carrying that thing,
at least 5 times.
The first time all I could think was to not drop it in the water.

Didn't seem like it but there was a chitload of welding to do.
It carried on til dusk.

sunset welding


My brother came by to help out too.

el jefe


By the time we finished it was too dark to take decent pictures.

metal rainbow


Weird how many uses there are for pipe.

double metal rainbow


Anyway some jobs like these are fun.
They are so random and it will be there for years.
Also makes working on cars or bikes so much easier,
or lighter duty anyway.


Long Hot Summer Night

TP


25 August 2011

double take - chopped 35 ford coupe ... and more!

Last weekend we dropped by this event called "Tiki Oasis".
There was a low key car show there and this car really stood out,
to me anyways.

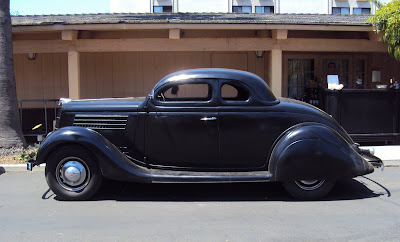
chopped 1935 ford 5-window  coupe


I've got a thing for chopped 5-windows and someone did an exceptional job on this one.
The chop is nothing like a drop down model A chop,
there are many curves and reverse reveals to deal with.
The roof was filled and stretched,
 but the crown looked stock.
Tough to do.

mild custom


This was the trippy part,
and I'm bummed I didn't take a closer look,
or take more pictures.

The fenders had 1937/1938 headlights,
so I figured they were modified 37 fenders too a 35 grille.

There are big differences in 1937 and 1935 ford grille outlines,
and the shape of the inner fenders is totally different.


ripped pic of a 1937 front end 


So most likely they grafted the headlight "bucket" to the fender.
The rubbed black paint was the perfect camouflage for the amount of work,
as it was tricky to tell if it's a recently done or old time car.


clean


Anyway I really liked it.
I'll be on the hunt for it to check it out further.
Can't believe I didn't take a rear shot.


This was cool too.

1960 ford country squire wagon


The perfect family car!

Since I'm starting to ramble I'll throw these last few pics up here too.

%%%%%%%%%%%%%%%%%%%%%%%%

While some of us hack away at rusty steel,
others spend there time hacking away at little pigs.

rotisserie pig


This was trippy - the pig rotated,
and there was a little fake fire coming out of a hole in the rocks.
If only we had some space in the house and a couple hundred extra bucks.

It must have been a theme as there were a bunch of different versions.


crazy pig


I liked this burro too.
Good thing we don't have a mantle to put it on.

burro


Meanwhile a side project of the Creepy Creeps - Creepxotica was outside playing.

creepxotica


Definitely made it a surreal morning.
Think I might buy their record.
Dionysus Records » Blog Archive » New Dionysus Releases by Jerry Sun and Creepxotica!

Anyway that's about it.

TP

24 August 2011

uh oh - door jamb time

The best way for me to see a project through is to get a little obsessed by it.
I'll go to sleep visualizing a certain aspect of the project,
trying to figure out the game plan.
You know the story...

However, without some (personal) shop time it's like a skipping record.
Sometimes I can overthink simple things a little too much,
so progress is important.


nasty door jamb


It is sick to say that this has been my recent sleep remedy.
No counting sheep or thinking about big tittied girls,
I'll go to sleep thinking about cutting rusty sheetmetal.

Holy Chit.

The door jambs on the coupe are basically nonexistent,
a shell of rust.
The doors aren't any better.

missing door frame


That's probably why I've been thinking about it so much.
This is gonna be one of the most time consuming projects left.

Last night after working on a more responsible project,
I was already a little dirty so I figured what the heck.
Let's start cutting.

operation


Why had I considered saving this rusty door jamb?
The other side was equally as bad.
(That inner piece was a newer support welded in)

Ok.
Now.
Put down the grinder.

stop?


I said,
put...down...the...grinder...

hmm


Hard to see but this hacked up nastiness looks worse up close.

Next thing I know it's all gone.

woops


Holy Chit.

holy chit


I couldn't stop.
Was this part of the dream sequence I had been planning?


skinny


There was no stress tweaking,
so figured it was safe to do the other side. 


work cut out for me


I couldn't see this rusty crap adding any structural integrity to the body,
so while it may have added a bit more work,
there was no way to integrate this chit into the new door jamb.

BEFORE


Ok,
maybe it was in the plan I just didn't realize it.
If you look real closely on the outer vertical edges of the window in this before pic,
the original door jamb is wider than the actual windshield frame.
The tricky part is it matches the width of the door,
well one of the doors as its missing on the other.
So after this part is rebuilt,
the doors must be fixed to match.

AFTER


Here you can see a much cleaner profile of the window.

I think I will build a motorcycle next.

TP

23 August 2011

flathead distributor fun

You know when you put something together,
and it runs and runs,
than then something happens to it,
and you have a little brain fart on how to fix it?

weedwacker rack


No the weedwacker works fine.
Earlier last week the 40 just crapped out.
We didn't get stuck anywhere,
it just didn't want to start in the garage.

The first thought was the wiring.
The kids like to crawl around in it,
Jaxon likes to pretend he's driving it.
Maybe a wire had loosened up or the ignition switch left on?

user not friendly


Nah,
a quick voltmeter check and there was power to the coil.
Maybe the coil or condenser went out?
Tough to check without replacing it.

mallory crab cap distributor


It is easy to see if there's power going to a point style distributor by moving the contact(s).
With the ignition on there will be a little spark.
These early flatheads have the front mount distributors,
so without a mirror there's not much visibility.

The easiest way to check it is by removing the cap and bolts but leave the wire on,
than flick the contacts to check for spark.

Nothing.


mallory dual point distributor
59a style


No wonder.
The inside of the distributor was clean,
but the points had a crusty film on them.
It looked like one point set barely had a gap!

Even though I had messed with the timing a while back,
the distributor hadn't been removed since at least 2007,
4 years or so.
Guess I can't complain too much!
Well kinda cause there's not been more than a couple thousand miles on it!

long-haired boy


It was a perfect chance to show the kids what a feeler gauge is for,
and how to file and adjust the points.
Yes I filed them clean,
didn't have a replacement set and they were like new when finished.

We didn't know the correct gap for the points,
and there was no matchbook handy.
So we googled it and found many different answers,
and that is a secondary reason for this post.

*************************************************************

The correct gap for a newer style mallory dual point distributor is .016 - .018"

(Vintage mallory's usually have a tag with the correct gap stamped on it.
So this measurement is for the newer mail order version.)

This is the "side of the road" gap measurement,
enough to get it running.
The points should be further modified after hooking up a dwell meter.
Most suggest somewhere around 33 for the dwell.

*************************************************************

Thankfully the engine started right up!

This is the case of electronic ignition vs breaker point ignition.
I haven't driven this too far away from home base,
but now I'm gonna make sure to have an extra point and condenser set,
just in case.

Many guys like to use the Pertronix or MSD electronic ignitions,
but man if they break down, than what do you do?
Only side of the road fix is to have a stock distributor and coil to swap?


no more bullhorns


Anyway enough of this.
It runs and I am happy.

Good time to remove the old bike rack,
now it doesn't look like a hick wagon.

TP


22 August 2011

How to make a bumper out of scrap

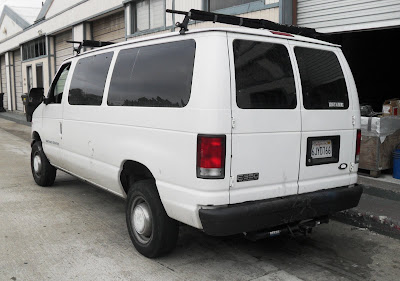
For some reason I couldn't live with the stock bumper on our van.
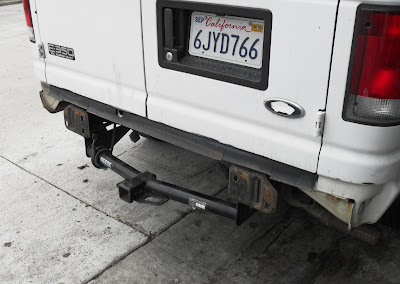
The bolt-on tow hitch was the real issue,
it was too low for some of the trailers we pull.
There must be a bunch of Ford E350 vans that can't pull trailers with this hitch.

In addition,
 the hitch would hit the curb when loading up the van at the shop.
Two excuses is enough for me to start a low priority project!


good ole van


At the time we were working on a job that used some perfect donor pipe.
Finally I had scrounged up the parts needed to build a decent bumper.

last view


The bumper part was easy,
it was trying to figure out how to attach the bumper that was difficult.
I drove around without a bumper for a couple days.

hmm


The old bumper was a perfect template for the new bumper.

new bumper
old bumper


Hey,
we had used over 30 or so feet of this 4" pipe,
so yeah this is considered scrap!

almost ready to go


I wasn't too worried about removing the bumper,
so some funky looking brackets were torched out.
Its surprising how thin the stock frame material is.

bumper mounts


Hopefully they would be straight.
The bumper fit in perfectly.

new bumper


There have been some heavy trailers pulled and the bumper hasn't fallen off.
Actually this was built long enough back that I used it to pull Chief to the GNRS!


after a few months


There are some things I would have done differently.
The bumper gets a little slippery,
so some welded bumps or grip would help.
I may add some of non-skid tape or some epoxy + sand.

Some ramps would be helpful too.


air tank


Also I should have triple welded those 90's and caps.
At the time I was thinking "show" bumper and wanted smooth seams.
Not really important just looks more industrial or pipe-fitter correct.
The bumper is leak free,
and some bungs were welded in so it can be used as an air or water tank.

caution - bumper


And finally over the weekend the kids and I installed the cherry on top,
the yellow and black caution tape,
since it doubles as a "maintenance department" van.

hit me


Easy!

Now how to do the front.

TP