What's happening.
I'm turning into one of those tube stereo geeks.

With the dark almost winter hours upon us,
instead of rushing home and working on a hot rod,
I look forward to sitting at our converted bar,
eyeglasses on,
maybe a drink - maybe not,
whittling away playing with wires and electrical stuff.

wiring a car isn't even my favorite thing to do.
I'm too picky and it's tedious,
but I'll do it,
and when everything works it's a big win.


 The second way is way more fun.
 Somehow that pile above equals this.


This Scott LK-72 integrated amp
was sold in the 60's as a kit.
A budget way for an electric geek to have tunes.
The factory wired model was the Scott 299C,
which had a gold face instead of poop brown.
Of course I ended up with a cheaper project...
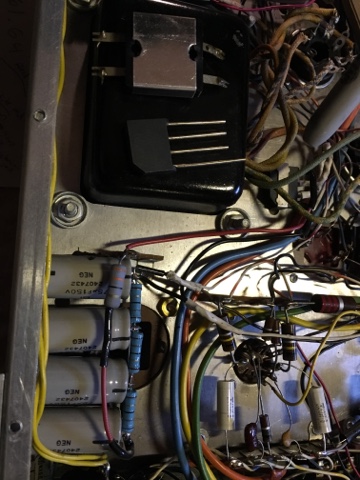
Over the years electrolytic capacitors tend to dry up,
or in this case leak.
That's the tan powdery residue.
These are multi-caps,
can capacitors that are a compilation of values.
Post-war technology made this easier,
most likely a byproduct of all the WWII factories
that needed to continue churning out hi-tech chit.
There's two main methods to repair these.
Buy replacements if possible,
they are usually plastic wrapped black or blue,
and possibly a little different size
needing different mounting clamps and holes.
Dig out the insides,
and replace them with new capacitors,
shaped like little batteries.
From the top everything looks original.
This involves grinding, fitting and thinking...
Like hot rodding but tiny.
Here there are ways to modify the ohm values,
online forums have high-priest geeks
that give out loads of info.
For now I'm just a swapper.
Let's hear what new stock woulda sounded like.
The roll of aluminum foil and electrolytic
is separated in 4 pieces.
These things basically are filter caps,
cleaning and storing the necessary power.
Trippy...
They call this silver box a toxic grenade.
It's a selenium rectifier that converts AC power to DC.
Supposedly not the best stuff to breath in
if it blows up.
Now swapped for a silicon bridge rectifier,
the black thing with the 4 prongs.
The suggested 1 amp replacement
was smaller your pinky fingernail,
not much to solder fat wires too.
This is a bigger 4 amp version.
Now the tedious part,
replacing a bunch of single capacitors,
those white tube things.
I think there were at least 22.
Again replacements were much smaller,
with tolerances much tighter.
The tipping point...
Where's that drink now!!
Will it poof or perform?
After letting it run for hours on test speakers,
it was time to power up the Klipsch/JBL thumpers.
Oh yea...
Sweet sound,
without the overheating it had when first bought.
Next up was hammering out a quick shield.
Too much voltage and glass in there,
an accident waiting to happen.
Originally these came with a louvered sheetmetal box,
that seemed to collect too much heat.
The taller screen allows another geeky thing,
tube rolling.
This is dangerous as original Mullards, sylvanias
telefunkens and GE's etc can be $50-100 a piece!
Fortunately there are new east European versions,
much cheaper.
The main power tubes are 7591's,
made from a variety of manufacturers,
and sizes vary.
The original bottom RCA's were much shorter.
I screwed up and bought the larger ones on top,
but they (electro-harmonics) didn't fit.
We'd go with the center JJ tube,
and wow I can't complain with the sound.
The 12ax7's are the preamp tubes,
kinda the sorters that refine the sound.
Most say these are the most important,
as they can limit the gain or volume,
and their sound is amplified both good and bad.
There's a lot of info on the many variations.
I went with new sovtek 12ax7lps,
supposedly the best budget tube.
And check out these boxes!
Instead of adding a separate insulation wrap,
a 5th lead is folded in,
safely cradling the tube for shipment.
Cool!
Whew!!
I warned you it was geeky!!
You should read online forums,
there's diehard viewpoints about this tube stuff.
The amp had its time to shine,
and man it did.
However deep down I knew it was unfinished.
If you look at the 2nd pic,
there are 4 can capacitors,
and I only redid the obviously leaky 2,
although there are parts for all.
The third one went much quicker,
with a cleaner wiring trick for the ground.
I almost want to redo the first one.
For now my OCD stopped at the 4th one.
I'll have to mentally prepare for it later.
Let's wrap this up!!
Lastly taller feet were added,
more air should flow...
And a nicer faceplate was found.
The original had an annoying scratch.
The paint is sooo thin.
And here we are!
About an 80% rebuilt unit.
Are you ready for a holey chit yet?
Oh yeah...
A semi-matching tuner was on Craigslist,
but it was incomplete and a gamble.
I ended up flipping it which paid for the tubes.
Super stoked on the sound.
It's not as muddy or thick as before.
Not quite the warm sound people rave about,
but the Scott's weren't known for that.
They have a real uncolored sound,
like that's what it's supposed to sound like.
Yea geeky chit...
Thanks for reading!!
TP
you seriously amaze me. Damned If I don't want to find amps, stereos, and speakers, bring them to you, just to see you post how you fix them!
ReplyDelete