22 December 2011

sugar sugar

Gotta love estate sales.
Creepy going through the house of a once thriving family,
but that's where ya find all the good stuff.

$2.50


The past weekend I drove by this one,
and out of all the stuff they had,
this was it for me.
A whopping $2.50!

This is my new hot cereal pot.
It's one of those Descoware cast iron type deals.
Works so good.
It must have had a hard life,
 as there's this funny old man fix on the wooden handle.
Well it's in good hands now!

sugar


The big score was this cool sugar dispenser.
I've always wanted one of these things.
Yeah it may have been easier to snag one from a restaurant,
but those times have past!

The cool thing about this one is it's one of the originals,
embossed 1959!
Wonder which restaurant the old guy snagged this one from!

Dispensers Inc.
Santa Barbara, Calif


I had no idea these things were invented out here on the west coast,
so of course I did some quick internet searching.

The Dripcut-Starline: the story of a classic sugar shaker's sweet design - Core77

Dripcut Starline | Shaker's sweet success - Los Angeles Times

In a nutshell,
the company "Dripcut-Starline Corp."
 hired Henry Keck and Bernie Craig to design a sugar dispenser.
This was about 1955.
Funny thing is they only received a flat payment for the design.
If they'd only known 35 million of them would be made!


Dispensers Inc.
dripcut-starline
sugar top no S-930
Santa Barbara, CAL.
Pat D184567
1959


I went to the local restaurant for breakfast yesterday,
and of course had to check out their sugar dispenser.

$7.07


Yep a Taiwan knockoff!

dripcut-starline sugar dispenser
1959


What's amazing about all this is I've quit drinking coffee!
Still need my daily sugar input though.

TP

20 December 2011

pipeworks

Here's a quick update while I wolf down some breakfast.

donor 350 chevy engine


Here's the donor 350 engine.
The 85 corvette it came from had 67000 miles on it,
and we're hoping it will get a couple more,
as this will get a rattle can rebuild.

Ken spent a while deburring the casting flash off the engine.
It really makes a difference,
especially when you're wiping it down and the rags aren't getting snagged.

(imagine a smooth engine here with black paint)

There is some dirty work left on the engine peripherals,
so first the engine has to be mounted,
again.
stock small block motor mounts


He bought some new motormounts,
but man they are so ugly right out of the box.
cleaned up small block motor mounts


A quick grinding and some low gloss paint and much more presentable.
Now time to go through some of his boxes and look for the headers.
hooker headers


These aren't quite the ones I was thinking of,
the ones I liked had the outlet inbetween the 3rd and 4th port,
but they'll have to do.
quick fit


Looks like they fit easy huh!
Well in typical Hurtlocker Truck fashion...
pre-notch


Nothing's ever a bolt-in!
The floor was a bit in the way.
post-notch


More work for later.
Sigh.
puta madre


In my infinite wisdom,
I cut the exact same notch on the other side,
since of course the other side would have the same problem.
Nope.
Puta Madre!
cut n paste time


I'll have to weld that up,
later...
This side has it's own set of problems,
the steering goes right through the front pipe.
I've been waiting to do this for a long time,
and it's lucky that only this one needs modification.

But first the column needed to be permanently set,
as the spacing is a bit critical.
big block venolia rod


This old Venolia rod had been stashed in that pile of v8-60 parts from long ago.
perich brothers (and sister): score!
This was it's time for a little chop chop.
chop chop


I would have liked a little more drop,
but Ken's a big guy,
so this would have to do.
pre-mod brake pedal


While I was in cut and paste mode,
figured it was the right time to dig out the brake pedal,
which couldn't work as it's going through the column pipe.
about right


This reminds me,
I've got to clean up the firewall support...
gratuitous stool shot


Ken's got some big feet,
so a little short should be fine.
Probably will hook the pedal part over too.
Later...
ergonomics


With everything mounted,
it looks like we had planned it all out like this.
Now,
back to the exhaust pipes.
I was able to think about the solution while doing the column mount.
stock 85 corvette center dump headers


In one of the previous installs,
the stock corvette headers actually fit,
just barely though without the 3-bolt flange
(cut off in picture)
My quick fix would utilize that front bend.
donor pipe


The donor was about 1/8" skinnier,
but right now there aren't alot of choices.
I really doubt it will make any performance differences,
and with some black paint it shouldn't be too noticeable,
unless someone is reading this.
working pipes


The main thing is it works,
and there's plenty of clearance,
like it was made to fit the stock corvette steering.
Hmmm.
modified hooker header


Now try to imagine it with the black BBQ paint,
and shiny stainless steering u-joints.
It'll do.

With all the headache stuff done,
or as much as I could remember to do,
it was time to rip the motor back out.


I don't know if you can see in this pic,
but this engine is immaculate.
There was no cleaning done to the insides.
Earlier on I had warned Ken not to be surprised to see some sludge or carbon buildup,
and when he took off the valve covers I was expecting the worst.
This time we got real lucky.
Finally!

Now you all are almost caught up.
I've got to go back in the fray.

TP

18 December 2011

threading the needle

I've driven many nighter freeway miles on the verge of sleep.
When coffee and music fails to work it's wonders,
a good trick to stay up was to open the windows to get as cold as possible,
than close them up and put the heater on to to warm up,
than repeat.
If you're passenger/navigator is annoyed,
than they're not doing a good job keeping you up.
Once I'm past that sweet spot of time from 3 til sunrise,
I'll be fine.
(no I haven't done this since having kids!)

threading the needle


Well the other day (swap meet last week)
 we were leaving the shop,
and the driver of this truck didn't know that trick.
He/she barrelled off the highway,
right between 2 palm trees.
It could have been ugly,
if you look closely at the pic,
 there's barely a foot if that next to the base of that tree.

Lucky guy!


Jimi Hendrix - 1983...a merman i should turn to be

This is not the song to listen to during this driving time.
It's like the lead in to something bad happening.
Bitchin song though.


TP

16 December 2011

plastic fantastic

This past week I've been a bondo slinger.
black face


Not with bondo though,
there's this Evercoat product called Z-grip that makes it fun to use.
Somehow it doesn't clog up the sandpaper,
which is a huge problem if you don't like to wait for it to cure.
****************************************************
**ok this is my hack tip
I had the partial can of z-grip from a previous project,
but no cream hardener.
Evercoat uses a blue pigment, Bondo uses the red.
Are they the same?
Well,
the active catalyst in both is BENZOYL PEROXIDE,
since they both are a polyester resin based filler.

(now read page 4 for some further confirmation!)
http://www.dtic.mil/cgi-bin/GetTRDoc?Location=U2&doc=GetTRDoc.pdf&AD=ADA503396
According to this report by the U.S. Army,
its basically the same stuff.

****************************************************
skim coat cover up


Yeah I had to use a skim coat over that dreaded corner.
Didn't want to show this picture really,
but I've not had many secrets to my loyal 18 readers,
so why start now right!
filler?
what filler?


The filler coat is actually not as thick as it looks,
but man it actually looks respectable now,
especially with that epoxy primer.
bumpy back


The next worst spot was underneath the rear window.
If you look at the shadow there's an obvious dent festival.
This is after hammering out all the big dents!
(There is a back panel behind the seat,
so access is really limited.)

Remember this was a work truck,
with a diamond plate bed and an engine hoist frame welded to the floor!

layers


The amount of filler applied,
and the amount sanded off is about half.

85 corvette rear end mounted


Slinging bondo isn't the only thing going on.
Ken's been scrubbing the aluminum so it's damn shiny,
and most is ready for the final installation.
dents?
what dents?


Again with the epoxy primer.
The panel still has some little dinks,
but it doesn't have the baggy eye look that it had before.
This was all done without a longboard too,
just an electric porter-cable 6" DA sander.
brows


The "last" part was the front fenders and grille area.
There was a bunch of heavy damage to both eye brows,
as well as the grill surround being welded up,
and removing the turn signal mounds.
Oh yeah,
also the crunched drivers front fender bottom.
Lotsa hammering but not good enough without the filler.

This shot is important because it also hints at what made this part of the job enjoyable,
my new used fan.
See it on the bottom corner there?
I had been searching for weeks (on CL) for a good shop fan,
and this deal came up at the most opportune time.
Without it I'm not sure if I would have tackled this part.
smooth
1955 chevrolet pickup


So now this main part of the body is about 90%.
The plan is to let the filler and primer cure while the mechanical part continues.
(Hopefully there won't be plates of bondo on the ground after launching off a hard bump)
Later on next week I'll try sanding and using some glazing putty to fine tune the feathering.

While I can pick apart certain areas,
it is so much better than it was.
Yeah it sucks to use the filler,
but the total amount used was less than 1/4 of the gallon,
and seriously half was sanded off and blown out by the fan!
Just don't tell anyone please.

Next up,
mechanicals...

TP

14 December 2011

racing the wasp

I hadn't heard from Mark (and wife Kathy)
about their sidecar race in November.
For some reason my head was spinning negatively.
did the motormounts break?  did the brake tabs fall off?
did one of them get injured?
Maybe this comes from having children.
I don't know.

(If you don't remember his 70's  WASP MX Sidecar with the kawasaki 650,
here's the link to the "build".)
perich brothers (and sister): wasp

Anyway as typical of a concerned parent,
they were out having the
 "best fun we have had in a while".
Kids....

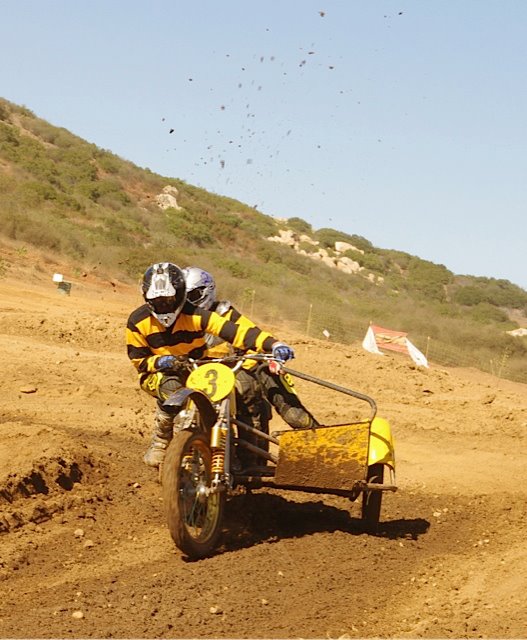
Mark and Kathy testing my welds
Jumping on a Wasp MX Sidecar


What can I say but "Holy Chit"!
I'll have to say Mark is a lucky guy,
his wife definitely gets a top ten coolest wife award!

right turn
Wasp motocross sidecar


left turn
Wasp motocross sidecar


Looks like Kathy has the sidecar "english" covered.
A lot of work controlling these things.

hold on!
Mark and Kathy Wood
70's Wasp MX Sidecar 


Hopefully they get good enough to have sponsors.
A "perich" sticker would look good on it,
or maybe some jerseys...

3


They had such a blast that another one is getting shipped from england.

race MX sidecar


He found a KTM 550 2-stroke for this rolling sidecar project.
I think they might like the extra suspension travel.


c-ya!


So this old Wasp will go into show duty.
Good to know it can still hold it's own.

TP

the first 100 - unearthed hot rod video!

We are lucky to be able to study the roots of traditional hot rodding (and customs)
with the help of a couple key books -

Birth of Hot Rodding
Amazon.com: Birth of Hot Rodding (9780760313039): Robert Genat: Books

All the Don Montgomery books
Amazon.com: Don Montgomery: Books

Muroc - when the hot rods ran
Amazon.com: Hot Rods On Muroc Dry Lake 1938 (9780910390309): William Carroll: Books

I have spent countless hours pouring over the pics.
Looking at all the little innovations that make a real hot rod.

We are really lucky that someone actually was dragging a camera around back then.

harper dry lakes
ripped screenshot


However a hot rodder friend up in Santa Cruz, (Dave) recently found the mother lode.
His "uncle" Tommy Lorbeer brought up an actual 8mm video camera to shoot
at the Harper Dry Lakes in 1940!

brand new 1940 ford at speed
ripped screen shot


Thanks to Dave and his son Conner,
 they digitized it and posted it on youtube yesterday.

Prepare to be blown away!


Some amazing stuff going on in this video.
So rare to see these machines and people actually moving.

Rufi Streamliner
ripped screenshot


This section blows me away.
The video is shot moving alongsite the Bob Rufi Streamliner!
Incredible.

bob rufi streamliner
ripped screenshot


I love it!

wrecked 1940 ford coupe


I also really dig this car.
This was probably brand new or close to it,
and it's already wrecked, okay damaged.
I'll bet this ended up as one of the first chopped or customized 40 coupes.
(okay obviously there's a customized '39 in the video,
so let's say it's one of the first!)
To me this gives the reasoning behind some of the early customs,
especially the one's with later model grills and the like.
Just like wrecked vw bugs turned into Baja Bugs.


almost taildragger 1940 ford coupe
ripped screenshot


As you can see I've torn this video apart.
There are more "iconic" cars,
 but I'll usually gravitate towards the real hot rods.
So cool.


1928 or 1929 ford roadster
ripped screenshot


Okay the next car I build definitely a roadster...


3 guys in a ford roadster
ripped screenshot


This shot brings back memories of a fun time for me.
Me, Luke "pigpen" Brown and Holly drove up to San Jose for a show in 2 cars,
but only one car made it back.
(thanks Neal for storing the 40!)

The three of us piled in
and drove the 29 "red dot II" roadster - 100's of miles back home!
Good times.

########################################################

We're lucky Dave's hot rodding roots reach so deep.
Please check out his website,
quality stuff coming out of the Seabright shop.

Seabright Hot Rods

he and his associates deserve all the credit for the video!

TP