29 June 2011

english invasion - Pt I - 1966 Lotus Cortina

Sometimes I wonder which houses are hiding all the secret stashes of cool stuff.
Yeah the majority of people are stuck with honda's and "best buy" junk,
but if even 5% of the population of San Diego County has something cool,
that's 150,000 people.

So on that note,
in a non-descript house in La Mesa,
my aunt and uncle have a serious collection of english cars.

1966 Lotus Cortina


My Uncle Robert is an English transplant,
and is lucky enough to have coerced my Aunt to be as much of a gearhead as he is.

1966 Lotus Cortina


Back in the 60's these little cars ruled the racing circuits and streets.
Basically they took the light Ford Cortina body,
and added a DOHC Lotus Elan engine.

Lotus Engine & suspension stiffener


In a NASCAR like move,
at least 1000 or 2000 of these cars had to be built as stock production cars
to be able to legally race in their "saloon car" class.


Here's the link for a more detailed history.


Cool to see the 7-liter Galaxy racing the 1.6 liter Cortinas!
Watch about the 30 second mark,
these cars were famous for their 3-wheeled turns.

1965 Indianapolis 500 winner badge


True to the Lotus heritage,
my uncle actually races this thing.
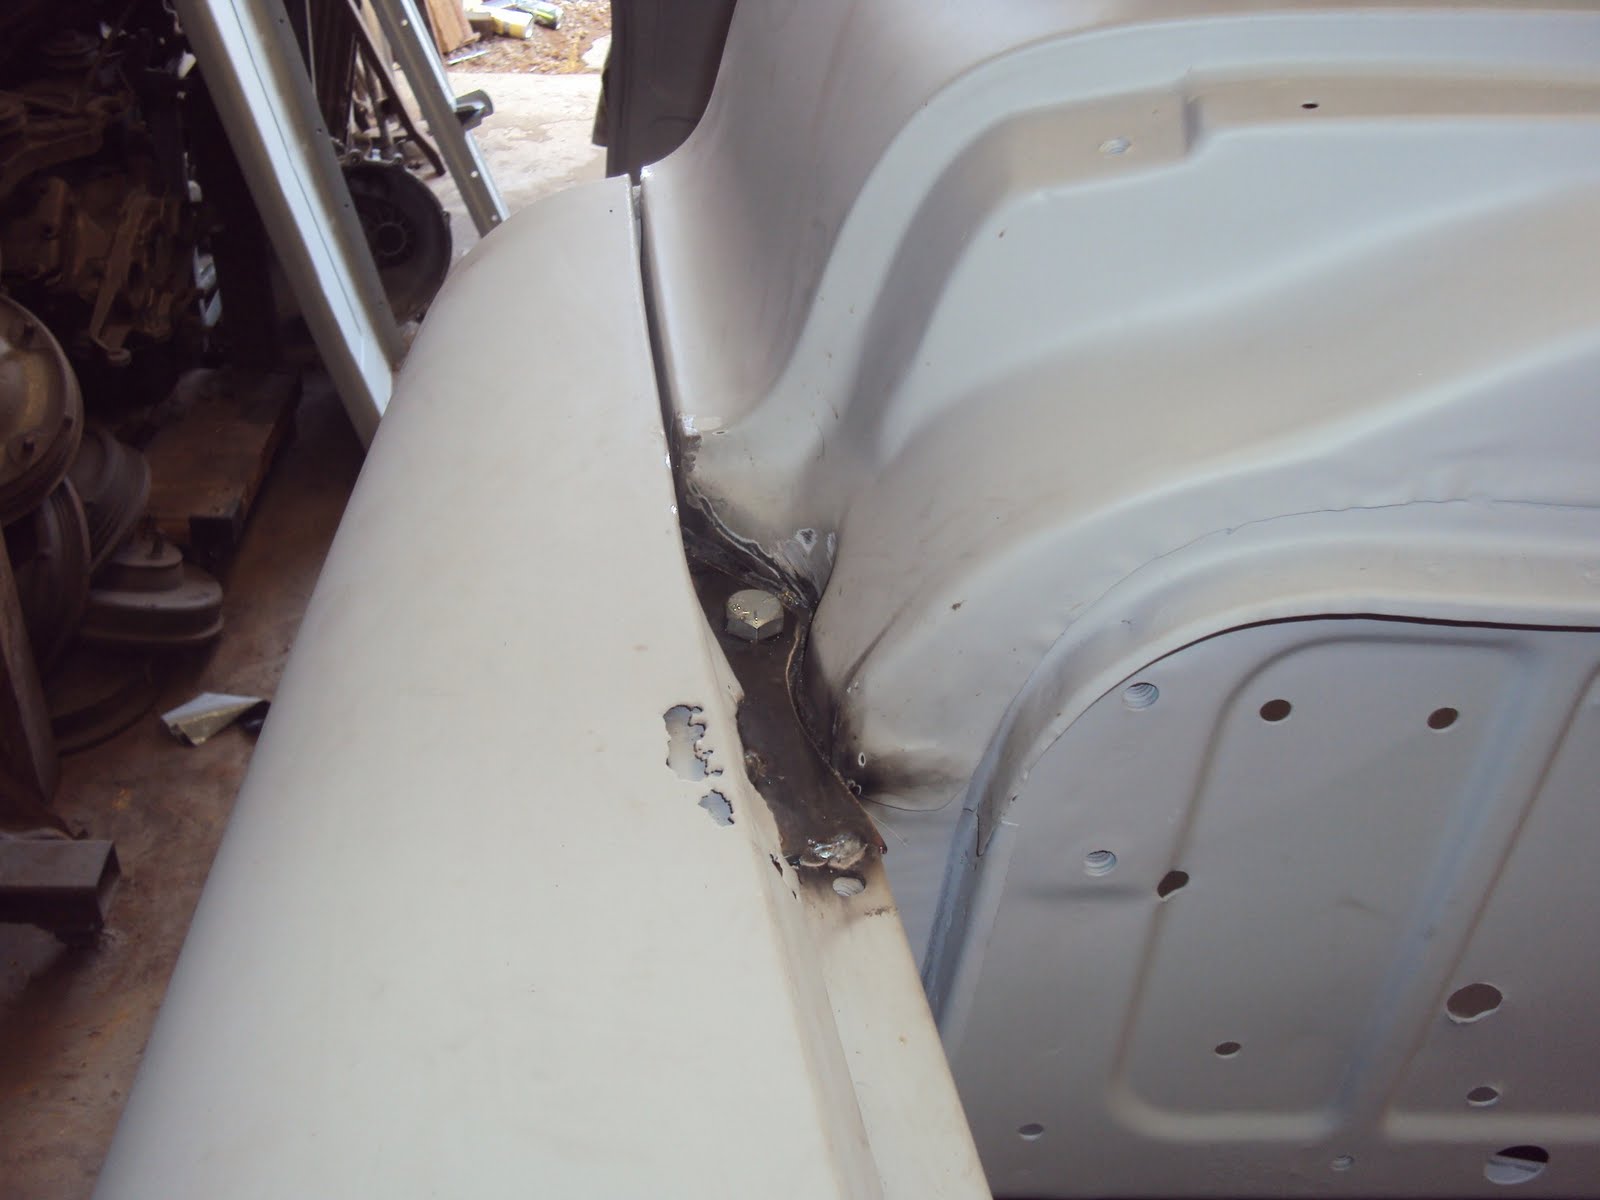
battle scars


And sadly it has taken some good spins and some rail scrapes.
Fortunately he's the type to get it repaired ASAP.

sign of a race car


Besides the roll cage,
another trick to call out a race car is that little tab up in the left corner.

body catcher


The upholstered pics are current.
He had it stripped down right after the groundup rebuild as a race only car...

race form


after a year of racing decided to reinstall the original upholstery,
including the back seat.
For a couple times a year racer that seems fine by me!

race fuel tank


Here's some TMI shots.

oil pan baffle


The oil pan looks to be widened but I'm not sure,
there is some custom baffling inside though.
Big carbs and some fat exhaust help a bit too.

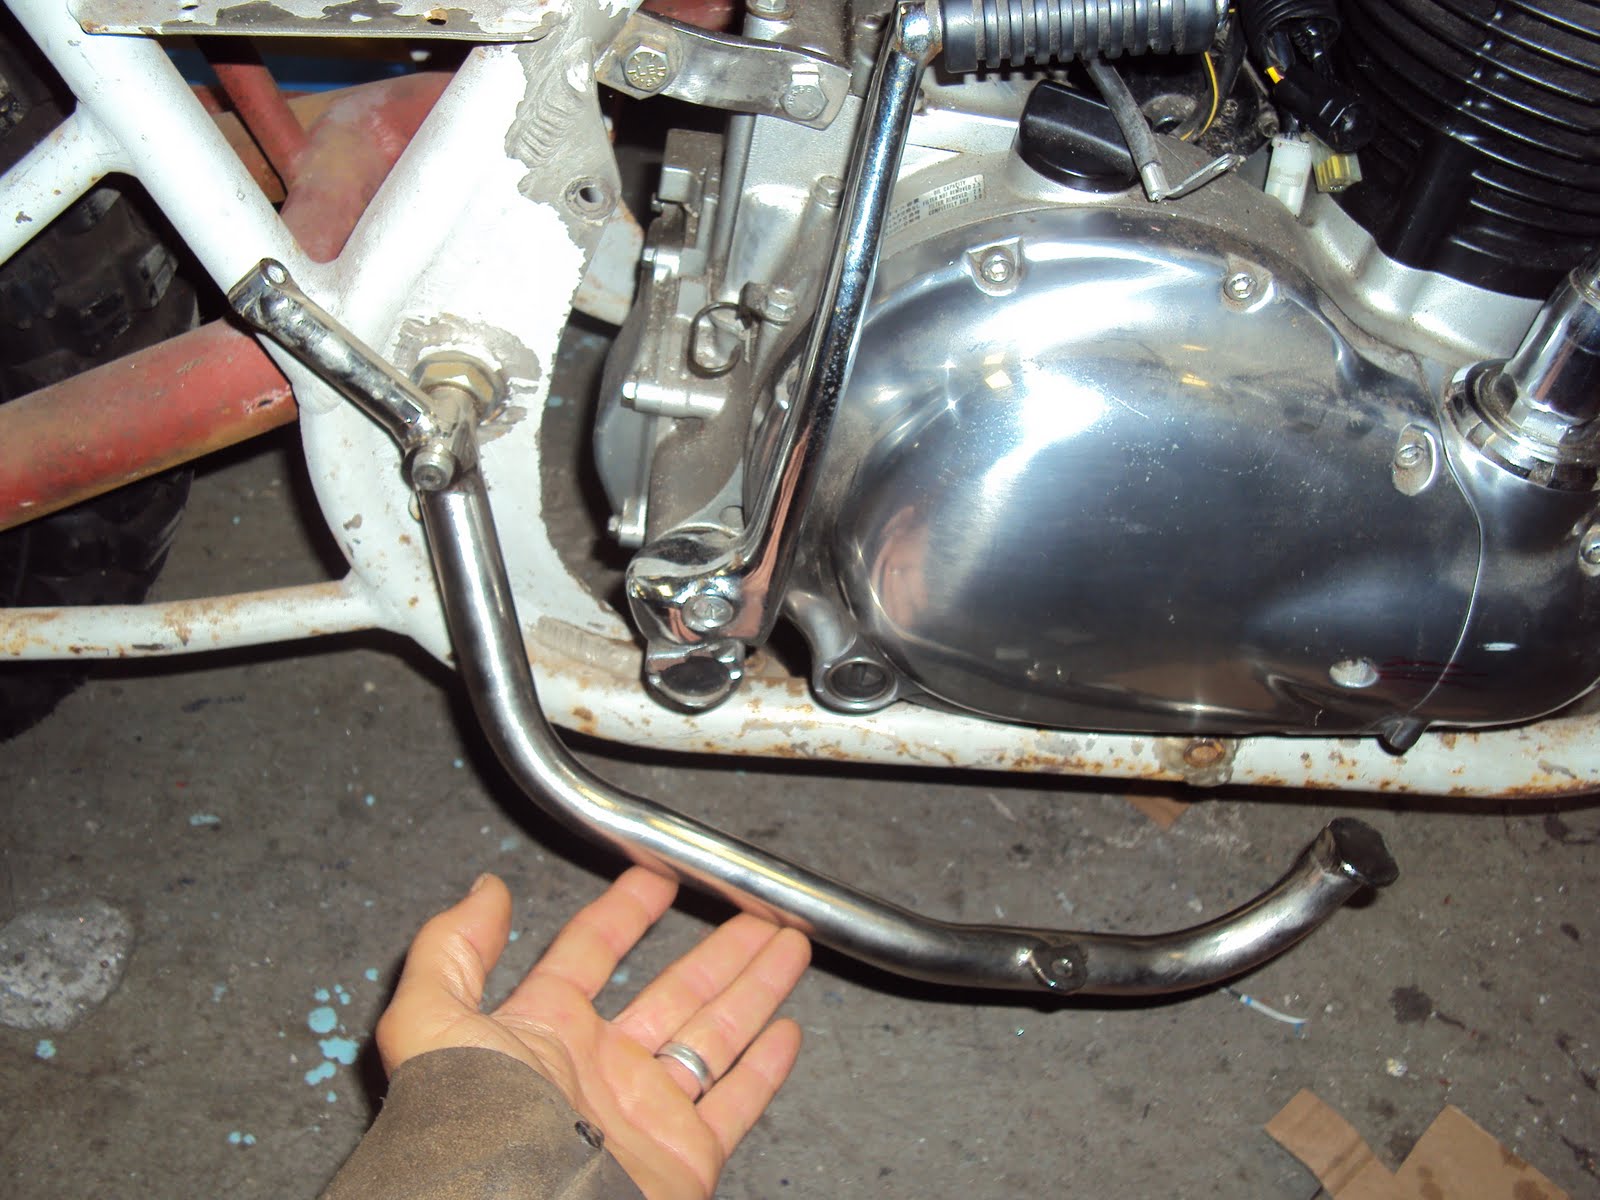
full flow exhaust headers


The engine has a ton of internal tricks,
and it sounds very expensive to fix.
There is an adjustable rev limiter on it to help tone it down.

Add caption


Even then he said the shift point is about 7500,
which seems high for a 1966 era car but what do I know.
He said they max out at about 10K for a dialed in engine,
but his rev limiter is set to about 8700.

tire quiver


Some courses have tire restrictions so these are some of the quiver.

last year ready for Laguna Seca


Next time I'll post up the pictures of that green thing next to it.

cortina and morgan


Later!

TP

27 June 2011

hurtlocker truck goes DONK!

Wake me up

1973 chevy impala 


one minute I think we're building a performance street rod/truck track freeway flyer,
and next thing I know we're building a donk truck like nobody's business.

1973 chevrolet impala


Not only am I now photographing Donk cars I see around town,
but now its 1am in the morning and I'm looking up Donk-style cars
as I'm a bit clueless on recognizing 70's gas hogs.
fat adapters


You remember these beauties?
Well they didn't fit,
Ken couldn't sell them,
so he decided to buy wheel adapters to make them fit.
Well, to make them fit the rotors or hubs anyway.
fender vs wheel
lets cut em up!


Now the track width is 5" wider than the stock corvette wheels!
Ehh, what's a couple inches right?
bubble truck


So I'm at a total loss of words with what to say.
No I'm not.
I can type as fast as I think and obviously haven't stopped yet.
Basically,
I'm a little stuck right now with the somewhat major design change,
and have to comply with a "whatever the customer wants" attitude.
roachy


The positives are I'm not to deep in this project,
a big week and I could be even,
and the additional time is like a change order,
just rack up the hours, there's not much other way around it,
and why give it up to someone else!
replacement bases


The other positive is there was so much work planned regardless of wheels and stance,
and Ken's picky enough to fix the wrong, not restoration just clean.
The truck was very "farm truck".
Many bolt on parts were welded, brazed, or thru bolted on.
Perfect!
replacement tops,
spyderco style


So now its time to look forward.
Chip away.
Somethings gotta pay rent and it is fun and wacky now that I've accepted it.
Also Ken wants to get this thing on the road,
not quit or stall halfway which is way worse regardless of styling.
I can build the baddest DONK truck around...No problem.
Whatever you want!
tacked up
front or bottom isn't mounted so gap pivots!


This side has a better gap,
there is alot of room in the holes for fine tuning.
no more weld-on fenders


Now that the body parts are back,
there'll be alot more updates and craziness to post on here.
1957 chevrolet truck


Fortunately I have a loud stereo to drowned out any negative thoughts!

TP

25 June 2011

baby steps - rear decklid preparation

I've been juggling a series of side jobs lately.
Right now it is the most efficient way to work,
completing whatever I feel can be done the best or fastest at the time.

rear decklid sitting pretty


When that project stalls or is completed,
I'll move on to another mini-step or another project.
It is similar to juggling,
and its good as long as there is forward progress.

old temporary decklid hinge assembly


Strangely enough,
an idea or solution will form when working on an unrelated project,
it beats sitting on the stool half-dazed in a mental quicksand overthinking options.


scavenged parts to reuse


There's a rule that if I am blocked for more than 30 minutes, (very rare)
I'll at least start cleaning or change it up somehow.


after some flapper disc time


This was a baby step during one of those moments!
I had made a perfectly working hinge assembly
 for the decklid for the '40 ford coupe.
It really was a mock-up to get the correct pivoting location.
The important parts were cut-off and cleaned up.

I'm in the fortunate position that my brother is a tool-junkie!

bitchin bead blaster


After some quick flapper disc time with the grinder,
I remembered the bead blaster stashed in the corner.

bead blasted


Wow what an awesome tool.
Not even 10 minutes cleaned all the cracks and crevices.

After that,
I had to get out the good old rattlecan.

drying rack


This is the first benefit of this juggling system.
After spraying a couple coats of paint on these,
I actually hung them up to dry.
No rushing to touch them and bolt them on,
ruining the not dried paint.
Huh,
who woulda thought.

rusty cave


This is the second benefit,
planning out how to make the rear reinforcement for the hinges
while working on a project that can pay the bills.
I already have the rough idea,
but at least everything is cleaned up and ready to go when I get the time.

And it only took an hour!
Stay tuned for more "baby steps"...

TP

miller vintage time

Finally picked up the welder from the fix-it shop, R.J. Kates.
It's good to have it back.

miller time


It had been a long time,
but it was my fault cause I missed the one phone call after the diagnosis.

Unfortunately I had searched online for the repair,
so already knew it was basically a bad contact.
If I knew how much the repair was going to be,
I would have tried to fix it myself!
Guess that's why I never go to a mechanic.

nice o-ring


The welder was partially disassembled,
although it was "bench tested" after the repair.
My heart sank a little when I saw this o-ring was all chewed up.
It is a tight fit,
but if the repair guy can't see cuts in a 20-cent o-ring and replace it,
is he capable of fixing the internals!?

no drinks on the welder


When I opened up the lid to put the spool on,
there was this weird stickiness inside.
(that black streak)
What the heck?
I know this wasn't there before,
as I had taken it apart already.

perich brothers (and sister): miller not time

There's a rule that I try to follow,
"no drinks on the welder".

before shot


On top of that,
they had stored it outside.
Sure these things are made for rough use and I am hard on it,
but I baby these things otherwise, especially not leaving it outside,
 and if so its covered.
You can tell by that maroon sticker it was outside for a while.

So 3 strikes.
I was hesitant to even turn it on.
The "fan on demand" feature is still broke,
and the fan still sounds like a bag of ball bearings.

Fortunately it works, and is still working so far.

I've got a bad work ethic,
I round down when I tally up my hours,
if it doesn't seem like the work done should have taken that long,
even if it did and no one else could have done it faster,
and I spend all night thinking how to do something.

I also tend to clean up or repair stuff that's in the general area that I'm working.
It doesn't take too long and it shows that you respect the work.

Maybe that's what makes me expect others to do the same,
especially when they charge top dollar to do monkey level work.
Even the stereo "repair" stuff I bombard you all with is equal in difficulty to what was done.

miller vintage MIG welder
miller dynasty 200dx TIG welder


Yeah,
I sound like a little whiny bitch.
But that's cause I'm a little sour as I'll be out over $400,
and I'm one cheap SOB.
Hopefully there's some kind of guarantee/warranty.

Time to get some work done at least.

TP

23 June 2011

stool time - wasp sidecar update

Here's a quick update on that Wasp Motocross Sidecar.

wasp


Yep that's it all done.
Well its gonna look the same in the dark.

I've been chipping away at it little by little.

Wasp MX sidecar project


I started by cutting out some aluminum floorboards.
They're not filed nice yet,
and they'll also get a bunch of holes so dirt and rocks will fall through.

shiny floorboards


Next was getting the engine situated.
It was trickier than I thought,
just to line the engine up correctly.

kawasaki w650


The Wasp frame was originally setup for a Kawasaki 750,
but now its a newer Kawasaki W650.
I'm not sure how similar the frame tabs are in correlation to the each engine,
but the mounting plates needed some radical angles.

motormounts


These are definitely overkill.
It's 1/4" stainless plate but the tabs are only 1/8".

crude but effective


There's alot of room for shaping.
It is a race bike so maybe some lightening holes would be cool.

rear mounts


The rear mounts had slight jogs in them.
It's hard to say whether it would have been better to redo the tabs,
but since the frame is nickeled it would add more finish work.

With the engine mounted the exhaust can be designed.
Later on I'll probably remove everything and buff it all out.

Oh yeah,
also started on the brake system.
Mark had found a donor foot pedal.

donor pedal


Not much could be used as it intersects with the starter pedal.
The lever also doesn't line up with anything.

brake system started


I didn't realize until cutting that everything is brazed on this frame.
It's a fat braze weld bead.
The MC bracket is tigged on but I'm considering doing a braze over it
just to keep it original styling.

progress


If I can just get everything to 80% at least,
than Mark can choose what he wants to be further refined.
At this point its good to have the work hours a bit more focused on necessity.

twin shock front end


The next little job is hooking up the steering dampener.
You may see it poking underneath the tank.
The original tab is behind the shock mount.

can you tell a difference in above pic?


That's about it for now.
It's a good project as it is a compilation of mini-projects,
well most cars and motorcycles are I guess.

stool time fun


More later.

TP